Winman-GST
![]()
·
How to import Sales Register / Purchase register data
from Tally to Winman GST?
·
How to import annual Purchase Register data from
Tally?
·
How to generate Sales Register Excel from Tally?
·
How to import GSTR-1 data from tally to Winman GST software?
·
How to export Purchase Register data to Excel from
Tally?
·
How to generate GSTR-1 JSON from Tally?
·
How to export Purchase data to JSON from Tally?
·
How to import GSTR-2 / 2B books data from Tally JSON
files?
·
I have already downloaded error report through software.
How to download the same again?
·
How to view / download the Error report if uploaded return
is processed with error?
·
How to delete the invoice / multiple invoices?
·
In GSTR sub-table
Delete icon is not visible after return upload. Why?
·
How to download GSTR-2A / 2B data to software?
·
How to download Annual GSTR-2A / 2B data?
·
How to Reconcile GSTR-2B data with Books data?
·
How the
GSTR-2A / GSTR-2B & books rows are segregated in different sheets?
·
How to Reconcile GSTR-2A
/ 2B data with Books data (upto January-2022)?
·
How to do Annual
reconciliation of GSTR-2A data (upto FY 20-21)?
·
How to generate Annual summary of GSTR-1?
·
How to export
GSTR-1 annual consolidated data to excel?
·
How to generate Annual
summary of GSTR-3B?
·
How to
download GSTR-1 / IFF data from GST site to software?
·
How to download Annual
GSTR-1 / IFF data?
·
What are the benefits of GSP facility?
·
Software is displaying as ‘Unregistered Copy’.
·
How to get registration
/ activation key for Unregistered copy of the
Software?
·
How to register the software
after the PC being formatted or changed?
·
Error message appears as
“Error encountered while performing registration”.
·
How to re-register the software using Surrender Key
after formatting or changing PC?
·
How to surrender the license before formatting / shifting
the software?
·
How to surrender the additional licenses?
·
How to download / install
the software?
·
How to download /
install the software if the PC does not have the Internet connection?
·
How to Reset
GSTR-1 / IFF data in software?
· How to delete all data uploaded to GSTR-1 / IFF in single click?
·
How to generate Annual summary of GSTR-1 and GSTR-3B?
· How to download GSTR-3B data to software?
Winman-GST
![]()
• How to import Sales Register / Purchase register data from Tally to Winman GST? OR How to import annual Purchase Register data from Tally?
To
watch the training video on import of Sales register data, click here.
To
watch the training video on import of Purchase register data, click here.
Procedure
to import Sales/Purchase Register data from Tally to Winman
GST:
Step 1: Generate Sales/Purchase register in tally
For procedure to generate Sales Register, click here.
For procedure to generate Purchase Register, click here.
Step 2: Import from Sales/Purchase Register
Click
![]() picture
in menu bar → ‘Sales’/ ‘Purchases’ → ‘Step 1 – Get data from Tally’ (if importing annual data,
use menu in annual window). Following window will open.
picture
in menu bar → ‘Sales’/ ‘Purchases’ → ‘Step 1 – Get data from Tally’ (if importing annual data,
use menu in annual window). Following window will open.

Browse
and select the ‘Sales/Purchase Register (Excel file)’. After updating the valid
excel path ‘Row showing ledger names in Excel’ will be visible and
auto-filled. Make changes if required. To continue, Click on ‘Proceed’.
Step 3: Mapping with Winman Excel Format
A window with the list of ‘Column in Tally excel’
will be opened as shown below.
⇒ ‘Column in software’ will be auto-filled, make necessary changes if
required.
⇒ In case of
Taxable value / Tax columns, fill ‘Tax rate’. (Note:
Column in software and Tax rate column cannot be blank.)
⇒ Click on ‘Proceed’ to continue.
Note:
The value filled in ‘Column in software’ & ‘Tax Rate (%)’ will be saved in
the file and auto-filled while importing sales register again.
Step 4: Update Winman’s
Excel Format
A excel will be generated & kept open. Update
the Excel by referring the Note given in ‘Sales’ / ‘Purchases’ sheet of the Excel.
Step 5: Import to Software
To import data in excel to software; follow the
instructions given in ‘Help’ sheet of the Excel.
• How to generate Sales Register Excel from Tally? OR How to import GSTR-1 data from tally to Winman GST software?
⇒ In Gateway of Tally, under Reports → Display
→ Account Books → Sales Register
⇒ Select required month → Click on ‘Export’ shown at the top
⇒ Click on 'current' (only for tally prime
user)
⇒ Select format / File format
as Excel (Spreadsheet)
⇒ Select ‘Yes’ for ‘Show Columnar
Register’ (in tally
prime, select 'Report Type' as 'columnar')
⇒ Select ‘Detailed’ in ‘Format’ / 'Format of Report' → Click ‘Yes’ to ‘Export?’.
You
can import this excel to software. For procedure, click here.
If
GST is enabled in tally, then you may generate GSTR-1 JSON file in Tally &
import to software. For the procedure, click here.
• How to export Purchase Register data to Excel from Tally?
⇒ In Gateway of Tally, under Reports → Display
→ Account Books → Purchase Register
Note: To
export annual data, select any month and then change the period (From & To dates) to cover whole financial year.
⇒ Select required month → Click on ‘Export’ shown at the top
⇒ Click on 'current' (only for tally prime
user)
⇒ Select format / File format as Excel
(Spreadsheet)
⇒ Select ‘Yes’ for ‘Show Columnar Register’ (in tally prime, select 'Report Type' as 'columnar')
⇒ Select ‘Detailed’
in ‘Format’ / 'Format of Report' → Click ‘Yes’ to ‘Export?’
If GST is enabled in tally, then you may generate
GSTR-2 JSON file in Tally & import to software. For the procedure, click here.
• How to generate GSTR-1 JSON from Tally?
To watch the training
video, click here.
Procedure to generate
GSTR-1 JSON file from Tally:
⇒ In Gateway of Tally, under Reports → Display / Display more reports → Statutory Reports / GST Reports
→ GST → GSTR-1 → change the period (From &
To dates)
⇒ Make corrections for mismatch displayed under ‘Uncertain Transactions (Corrections needed)’ row.
⇒ Click on ‘E-return’ / ‘Export GSTR-1’ shown at right of the page (for
Tally ERP 9 user)
⇒ Click on ‘Export’ shown at top of the page → E-Return / GST Returns → Export (only for tally prime
user)
⇒ Select format as ‘JSON (Data Interchange)’ → click ‘Yes’ to ‘Export?’
⇒ Click on ‘Send’ / ‘Export’ (only for tally prime user).
You can import this JSON
file to software. To import, click ![]() icon ‘Sales’ → Import JSON or
icon ‘Sales’ → Import JSON or ![]() picture given against ‘GSTR-1 Sales (outwards
supplies)’ → Import JSON file.
picture given against ‘GSTR-1 Sales (outwards
supplies)’ → Import JSON file.
You can import purchases data from Tally JSON file to
software. To import, click ![]() picture given against
‘GSTR-2B Purchases’ →
Import
JSON file from tally.
picture given against
‘GSTR-2B Purchases’ →
Import
JSON file from tally.
To generate Purchase JSON
file in Tally,
⇒ In Gateway of Tally, under Reports → Display / ‘Display more
reports’ → Statutory Reports / GST Reports → GST → GSTR-2 → change the period (From & To dates)
⇒ Make corrections for mismatch displayed under ‘Uncertain Transactions (Corrections needed)’ row.
⇒ Click on ‘Export’ shown at top of the page → E-Return
⇒ Select format as ‘JSON GSTR-2 (Data Interchange)/ ‘JSON (Data
Interchange)’ → Select ‘Yes’ for ‘Export unreconciled invoices’ → click ‘Yes’ to ‘Export?’
⇒ Click on ‘Send’ (only for tally prime user).
•
I have already downloaded error report
through software. How to download the same again?
You can
download the error report through software only once. If you have not saved the
error report, again you cannot download the same through software.
In such
cases, to download the error report manually,
·
login
to GST website → click ‘RETURN DASHBOARD’ option → search relevant filing period
·
click ‘PREPARE OFFLINE’ under relevant GSTR → click ‘Download Error report’ under ‘Upload History’.
Please note, the manually downloaded error
report will be in JSON format. The same cannot be extracted by software again.
If you are not able to understand the same, you may re-upload the return
through software. Then, the error report will be generated in GST site.
Download the same through software.
• How to view /
download the Error report if uploaded return is processed with error?
To
watch the training video, click here.
To download
the Error report through software, go to ‘Forms’ menu → select relevant GSTR → ‘Check e-return upload Status’.
Please ensure
to save the downloaded Error report. You can download the error report through
software only once.
In GST
website, Error report is available in JSON format. Software automatically
extracts the data from Error report and shows it in Word format. If you have already
downloaded Error report through software, but not saved it, click here for the procedure to download it
manually from GST website.
Note: Sometime, if GST website working is slow, report
may not be available for download for more than 2 hours.
To watch the training video, click here.
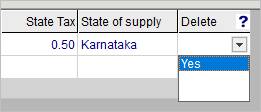
⇒
To delete already uploaded
invoices/rows
Select ‘Yes’ in the ‘Delete’ column of respective row as shown below & re-upload the return
(For FY 22-23
and before, select ‘Delete’ in the ‘Action’ column of respective row)
On successful upload, data will be deleted from the software and GST
website.
To reset / delete all uploaded data of
GSTR-1/ IFF, click here.
Note: ‘Yes’ list will
be shown only if the invoice is uploaded to website.
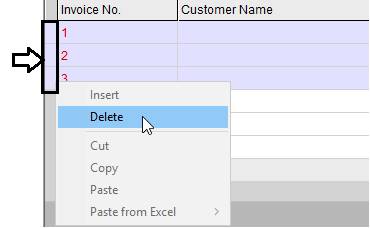
⇒
To delete invoices/rows which are
not yet uploaded to GST website
Right click on the leftmost cell of respective row and select ‘Delete’.
To delete multiple invoices/rows, select the rows to be deleted by
dragging on the leftmost cell of respective rows (same as Excel file), right click on the selected row → Delete.
To delete the entire
data entered in the table, click on ![]() picture given in top of the table.
picture given in top of the table.
Note: If return is
processed with error in portal, then sub-table will be locked for editing in
software. To unlock, download the error report. Click here
for the procedure.
•
How to download GSTR-2A / 2B data to
software?
OR How to download Annual
GSTR-2A /2B data?
⇒
For GSTR-2B -
monthly/quarterly data:
·
Click ![]() picture
given against ‘GSTR-2B Purchases’ → ‘Download & import - GSTR-2B’ / ’GSTR-2B (quarterly)’
picture
given against ‘GSTR-2B Purchases’ → ‘Download & import - GSTR-2B’ / ’GSTR-2B (quarterly)’
Or
·
Go to Forms menu → GSTR 2A/2B → ‘GSTR-2B data download - Import to software’ / ‘GSTR-2B (quarterly) – Import to software’.
Note: GSTR-2B
Quarterly download option is available only for QRMP opted cases in the last
month of the Quarter.
⇒ For
GSTR-2A / 2B annual data:
·
Click ‘9’ / ‘9/9C’
in menu bar then click ![]() picture given against ‘GSTR-2A
Annual Reconciliation’ or ‘GSTR-2B
Annual Reconciliation’.
picture given against ‘GSTR-2A
Annual Reconciliation’ or ‘GSTR-2B
Annual Reconciliation’.
Or
·
Go to Forms menu → GSTR 9 → Download Annual data – GSTR-2A / GSTR-2B.
·
For GSTR-2A, after 20 minutes click on the same menu again.
The JSON file will
be downloaded and imported to software.
Annual GSTR-2B
reconciliation option is given from FY 2022-23.
Note: For reconciliation procedure, click here.
•
How to Reconcile GSTR-2B
data with Books data? OR
Reconcile Annual GSTR-2A
Below procedure is applicable from February-2022 (monthly) / FY 21-22 (annual for GSTR-2A). For help on reconciliation of GSTR-2A/2B data of earlier tax period, click here.
To watch
the training video on Reconciliation of GSTR-2B, click here or go to Help menu →
Training
Videos →
under ‘Others’ head → GSTR-2B
Reconciliation.
Step 1: Download &
Import GSTR-2B/2A data:
⇒
To download GSTR-2B monthly /
quarterly data, select required month and click ![]() picture given against ‘GSTR-2B Purchases’ → ‘Download & import - GSTR-2B’ / ‘GSTR-2B (quarterly)’.
picture given against ‘GSTR-2B Purchases’ → ‘Download & import - GSTR-2B’ / ‘GSTR-2B (quarterly)’.
⇒ To download Annual GSTR-2A /
2B data
Click ‘9’ in menu bar then click ![]() picture given against ‘GSTR-2A Annual Reconciliation’ or ‘GSTR-2B Annual
Reconciliation’.
picture given against ‘GSTR-2A Annual Reconciliation’ or ‘GSTR-2B Annual
Reconciliation’.
Note: Annual
GSTR-2B reconciliation option is given from FY 2022-23.
![]()

Step
2: Import Books data
Books data can be imported from Tally file or Excel or can enter manually also.
For procedure to import from Tally
file, click here.
To import data from Excel, click on ![]() picture given against ‘GSTR-2B Purchases’ / ‘GSTR-2A Annual Reconciliation’ heading row → ‘Export format’ → ‘Without
data’. For further procedure, please refer ‘Help’ sheet of
Excel.
picture given against ‘GSTR-2B Purchases’ / ‘GSTR-2A Annual Reconciliation’ heading row → ‘Export format’ → ‘Without
data’. For further procedure, please refer ‘Help’ sheet of
Excel.
Step
3: Reconcile & fill ITC
⇒
Software will automatically reconcile the data as per GSTR-2B/2A
& books and show it in different sheets like Partially Matched, Matched, 2B/2A only, Books only. Further, in ‘Partially Matched’
sheet, the unmatched values will be shown in red font in GSTR-2B/2A row and in
light blue font in Books row.
Click here to know how the rows are segregated in
different sheets.
⇒ If you want to ignore minor difference in Tax amount, update required value in ‘Ignore
tax difference up to Rs.’ row.
⇒
Verify the data and fill ‘ITC Availability’
column in books rows. In case of ‘2B/2A only’ rows, ‘ITC Availability’ can be filled in 2B/2A rows.
⇒
If ITC is partially available, select
‘Yes’ in ‘ITC Availability’ then reduce the amount auto-filled in
‘ITC’ columns.
⇒
In case of missing invoice or wrong
data in 2B/2A, inform supplier to update the same in their GST return.
List items are given in ‘ITC Availability’ column:
·
Yes: select if ITC available for the
month.
·
No: select if ITC is not eligible /
Invoice is not related to taxpayer.
·
Pending: select if ITC to be claimed in
subsequent month.
• How
the GSTR-2A / GSTR-2B & books rows are segregated in different sheets?
Software will automatically
reconcile the data as per GSTR-2B/2A & books and show it in different
sheets like Partially Matched, matched, 2B only, Books only etc... You can
click respective radio button to view those rows. Necessary instructions are
given below the sheet name as shown in below picture.
|
Sheet name |
Data shown |
|
Partially Matched |
·
Partially matching
GSTR-2B/2A and Books rows are shown. ·
The values having mismatch
will be shown in red font in GSTR-2B/2A row and light blue in Books row. ·
Mismatch reason (i.e., in
Tax / invoice details) is shown in the last column |
|
2B/2A only (Not in Books) |
GSTR-2B/2A rows which do not have matching Books row. |
|
Books only (Not in 2B/2A) |
Books rows which do not have matching GSTR-2B/2A row. |
|
Matched |
Books rows having matched rows in GSTR-2B/2A are shown here. Some minor differences like tax/taxable value differences in
decimal, Invoice values difference, etc. will be ignored and considered as
matched. |
|
Other sheets (for quick reference) |
|
|
ITC Available |
·
Books rows having ‘ITC
Availability’ - Yes/blank ·
GSTR-2B/2A rows having
‘ITC Availability’ - Yes |
|
ITC not Available |
Books rows having ‘ITC Availability’ - No |
|
ITC – Pending |
All rows having ‘ITC Availability’ - Pending |
|
Revised Purchase register |
·
All Books rows ·
GSTR-2B/2A rows having
‘ITC Availability’ - Yes |
|
All 2B/2A / All Books / All rows |
All GSTR-2B/2A rows / All books rows / All rows as selected |
To view sheets mentioned in last 3 rows, click
dropdown list given against ‘Others’ option.
• How to
Reconcile GSTR-2A / 2B data with Books data (upto January-2022)? OR
How to do Annual reconciliation of GSTR-2A data (upto FY 20-21)?
Below procedure is
applicable up to January-2022 (monthly) / FY 20-21 (annual). For help on
reconciliation of GSTR-2A/2B data of latest tax period, click here.
You just need to download
GSTR-2A/2B which contains the data updated by your sellers in GST website,
through GSTR-1. Then reconcile it with data as per the
Purchase register through the step by step process and fill the ‘Action’ columns for each row. The GSTR-2A/2B and Books rows having same
GSTIN and Invoice No. will be shown one by one for your easy reference.
The reconciliation steps are
given below:
Step 1: Download & Import GSTR-2A/2B
data:
⇒ To download GSTR-2B (monthly data)
Select required month, click ![]() picture given against ‘GSTR-2B
Purchases’ → ‘Download
& import - GSTR-2B’ or go to Forms
menu → GSTR 2A/2B → ‘GSTR-2B data download
– Import to software’.
picture given against ‘GSTR-2B
Purchases’ → ‘Download
& import - GSTR-2B’ or go to Forms
menu → GSTR 2A/2B → ‘GSTR-2B data download
– Import to software’.
⇒ To download GSTR-2A (Annual data)
Click ‘9/9C’ in menu bar then click ![]() picture
given against ‘GSTR-2A Annual Reconciliation’.
picture
given against ‘GSTR-2A Annual Reconciliation’.
![]()

After 20 minutes from request being sent, click ![]() picture
again to download & import the data.
picture
again to download & import the data.
Step 2: Import Books data
For procedure to import
Purchase Register data from Tally file, click here.
Alternatively, to import data from Excel,
Export Excel format by
clicking ![]() picture given against ‘GSTR 2A/2B Purchases’ → ‘Export Format’ → ‘Without data’. For further procedure, please refer ‘Help’ sheet of Excel.
picture given against ‘GSTR 2A/2B Purchases’ → ‘Export Format’ → ‘Without data’. For further procedure, please refer ‘Help’ sheet of Excel.
How to Identify Books & GSTR-2A/2B rows?
The GSTR-2A/2B rows
are shown in Pale yellow
colour.
Books rows are shown in white colour (data from accounts books).
Further ‘Origin’ column
of GSTR-2A rows are filled with value ‘2A’ and GSTR-2B rows are filled
with value ‘2B’ and that of Books rows are filled with value ‘Books’.

Fill ‘Action’ column
Action column contains 4
list items:
Accept : To
accept the row
Reject : To
reject the row
Pending : To postpone the decision
Modify : If table contains only GSTR-2A/2B row and you want to edit
the same
⇒ When to select ‘Accept’: Select this item if values existing in that row are proper.
Now, ‘Action’ column of other row having matching GSTIN, Invoice No., and Tax
Rate will be updated as ‘Reject’. E.g., if 2A/2B row is updated as ‘Accept’,
books row will be auto-filled as ‘Reject’.
⇒ When to select ‘Reject’: Select this item if values existing in that row are not
acceptable. Now, ‘Action’ column of other row having matching GSTIN, Invoice
No., and Tax Rate will be updated as ‘Accept’.
⇒ When to select ‘Pending’: Select this item if you want to fill ‘Action’ column in
succeeding step or at the end of reconciliation process.
⇒ When to select ‘Modify’: Select this item if table contains only GSTR-2A/2B row and
you want to edit the same. Then, a books row having values same as that of
GSTR-2A/2B row will be created. You can edit the value in that books row.
Steps in reconciliation
To make the data comparison task easier, GSTR-2A/2B rows and Books
rows are classified and shown. Fill ‘Action’ column in each step. After completing each step,
click ‘Next’ button given at the bottom of table.
Note: the steps are not
available in ‘Credit / Debit notes - Received from Registered Suppliers’ table.
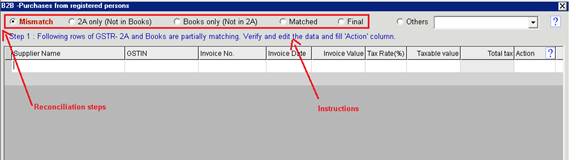
1. Mismatch:
If GSTR-2A/2B and Books
rows are partially matching, such rows are shown under ‘Mismatch’ option.
Following mismatches will be listed out here:
- GSTR-2A/2B & Books rows having matching GSTIN, Invoice No. and
Tax rate but Tax amounts are not matching
- GSTR-2A/2B & Books rows having matching GSTIN, Invoice No. and
Tax amounts but Tax rates are not matching
-
GSTR-2A/2B & Books rows
having all matching details but Invoice No.s are not
matching
The GSTR-2A/2B and Books
rows having same GSTIN and Invoice No. will be shown one after another for your easy reference. Fore-colour of the cells in which values
differ will be made red for GSTR-2A/2B row and light blue for Books row. Verify
the values and fill the ‘Action’ column or correct the data in Books row.
2. 2A/2B only (Not in Books):
The GSTR-2A/2B rows, which
do not have matching Books row will be listed under this option.
3. Books only (Not in 2A/2B):
The Books rows, which do
not have matching GSTR-2A/2B row will be shown under
this option.
4. Matched:
If GSTIN,
and tax amounts are matching in Books and GSTR-2A/2B rows, such Books rows will
be shown under this option. The matching GSTR-2A/2B row will be filled with
value ‘Matched’ in ‘Action’ column.
5. Final:
This is the final step of
Reconciliation process. All the accepted rows will be shown here.
For
your easy reference, some more filters are given in software. To use, select ‘Other’ option → select any of the following item
appearing in Dropdown box:
All 2A/2B
All Books
All rows
Revised Purchase register (if this item is selected, all accepted rows
will be shown)
·
To generate Annual GSTR-1 summary,
Go
to ‘Forms’ menu
→ GSTR-1
/ IFF (for GSTR-1) → Annual
Summary. Or
Go to ‘9/9C’ window
→ Forms
menu → GSTR-9 → GSTR-1/3B
Annual reports → GSTR-1 Summary.
·
To export GSTR-1 Annual consolidated data,
Go to ‘9/9C’ window → Forms menu → GSTR-9 → GSTR-1/3B Annual reports → All months’
consolidated data.
Alternatively, if GSTR-9 is enabled
in GST website, you
may download the GSTR-1 summary from website using Forms menu → GSTR-9 → Download GSTR-1/3B Summary
(website) → GSTR-1 summary.
Note: If data does not exist in GSTR-1 tables in
software, summary will not be shown. Click here for procedure to download data
from website.
• How to generate Annual summary of
GSTR-3B?
Option 1:
To generate GSTR-3B Annual
summary,
Go to ‘Forms’
menu → GSTR-3B → Annual Summary. Or
Go to ‘9/9C’ window → ‘Forms’ menu
→ ‘GSTR-9’ → GSTR-1/3B Annual reports → GSTR 3B - Summary.
Annual summary of GSTR-3B will
be generated in an excel file in which data of all months are segregated and
shown.
Note: If
data not exist in GSTR-3B tables in software, summary will not be shown. Click here for procedure to download data from website.
Option 2:
If GSTR-9 for relevant FY is
enabled in GST website, you may download the GSTR-3B summary from website using
Forms menu → GSTR-9 → Download GSTR-1/3B Summary (website) → GSTR-3B summary.
• How to download GSTR-1 / IFF data
from GST site to software?
OR How to download
Annual GSTR-1 / IFF data?
⇒
To download
GSTR-1 / IFF monthly data to software:
·
Click
![]() picture given against ‘GSTR-1 Sales (outwards supplies)’ / ‘IFF - Invoice Furnishing Facility (for GSTR-1)’ → Download data -
Import to software.
picture given against ‘GSTR-1 Sales (outwards supplies)’ / ‘IFF - Invoice Furnishing Facility (for GSTR-1)’ → Download data -
Import to software.
Or
·
Go
to Forms menu → GSTR-1 / IFF (for GSTR-1) → Download data – Import
to software.
A request will be sent to GST portal
for generating the JSON file. After 20 minutes, again click on the same menu.
GSTR-1 / IFF data will be imported to software.
Note: Using GSP facility you may import data quickly, but you need to enter OTP sent to taxpayer’s registered mobile number / e-mail ID. This facility is available in the software from FY 2021-22.
⇒
To download
GSTR-1 / IFF annual data to software:
·
Click
‘9/9C’ in menu bar, go to Forms menu → GSTR-9 → Download Annual data - GSTR-1.
Or
·
Click
![]() picture given against ‘Download GSTR-1 Annual data’.
picture given against ‘Download GSTR-1 Annual data’.
A request will be sent to GST portal
for generating the JSON file. After 20 minutes, again click on the same menu.
GSTR-1 / IFF data will be imported to
respective months in software.
⇒
To get
GSTR-1 / IFF Annual
data in Excel:
Click here for
the procedure to get Annual GSTR-1 / IFF data or summary in Excel.
• What are the benefits of GSP facility? OR How to enable GSP facility?
To
enable GSP facility in software, go to 'Tools' menu → Settings →
under 'e-filing' → select 'Yes' for 'GSP facility
required?'.
After
changing the setting, enable API access in relevant Taxpayers’ profile in GST
portal. Click here for the procedure to enable
API access.
The benefits of GSP facility are:
·
Faster e-filing / download -
process hardly takes a few seconds!
·
Need not login to GST website -
you need to enter OTP sent to taxpayer’s registered mobile no. instead of login
password & captcha code.
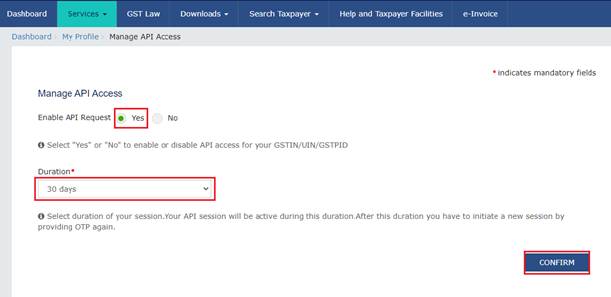
⇒ Open respective Taxpayer’s file & go
to 'Online' menu → Others
→ Enable API Access.
⇒ Login to GST site. Then, in the located page, select ‘Yes’ for
‘Enable API request’, select the Duration and click ‘CONFIRM’.
Notes:
·
Enable API access to be done for
each Taxpayer separately.
·
We recommend you to select
maximum duration, i.e., 30 days. Then, if you have Static IP address, OTP entry
will be required only for 1st usage in duration of 30 days.
However, if IP address is not static, OTP needs to be
entered every time while using GSP features.
• Software is displaying as
‘Unregistered Copy’. OR How to get registration / activation key
for Unregistered copy of the Software? OR
How to register the software after the PC being formatted or
changed? OR Error message appears as “Error encountered
while performing registration”.
Software will display the text
‘Unregistered Copy’ in following cases. Registration process is mentioned
therein.
⇒ License is surrendered:
If the
license is surrendered using ‘Tools’ menu → ‘Surrender Registration’. Click here for the procedure to register the software
again.
⇒
Hard disk crash/PC is
formatted or changed (license is not surrendered):
In such
case, to obtain registration code, please mention the reason for not
surrendering the license (i.e., about hard disk crash or formatting/changing of
PC) in the query and send through ‘Query manager’.
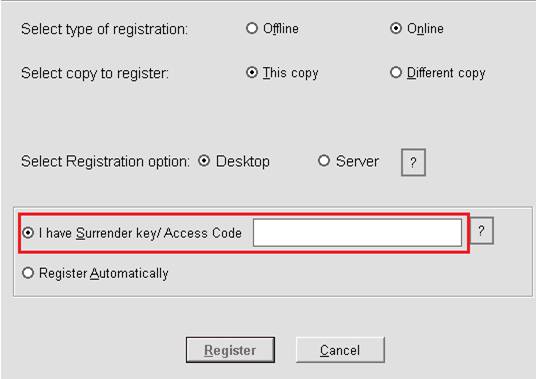
⇒ New additional license Purchased:
In case of online payment, go to ‘Help’ menu → Registration → select ‘Online’ option → enter 6 or 8 digit serial number of existing software copy against ‘I have Surrender key/Access Code’ → click on ‘Register’.
If payment is done through a mode
other than ‘Online payment through Winman’, you need to
send payment details to us using ‘Help’ menu → ‘Send Payment Details’.
⇒ Software is installed but not
Purchased/Registered:
Software will be displaying as ‘Unregistered Copy’ if software is
installed but not purchased/registered. To buy license, go to ‘Help’ menu → ‘Buy now’.
To register, go to ‘Help’ menu → Registration → select required option.
⇒
Other than above reasons:
Please mention the reason for
un-registration in your query and send it through 'Query
manager'.
•
How to re-register the software using
Surrender Key after formatting or changing PC?
After formatting, when you open the software in same PC for the first
time, a message relating to re-registration will appear. Click ‘Yes’ to register. Alternatively, you can follow the below
mentioned steps to re-register:
In case of re-registration in different PC,
⇒
For PC having internet connection:
Step 1: Go to ‘Help’ menu in the software → ‘Registration’.
Step 2: Select ‘Online’ option → enter the Surrender key against ‘I have Surrender key/Access Code’ → click on ‘Register’. Winman
CA-ERP/Winman TDS will get registered automatically.
⇒
For PC not having internet connection:
From a PC having internet connection, send the ‘Surrender key’ and ‘Computer Key’ through ‘Query manager’ tool available under ‘Help’ menu or click ![]() picture. ‘Registration Key’ will be communicated to you.
picture. ‘Registration Key’ will be communicated to you.
Note: However if license is not surrendered
before formatting or changing PC (due to hard disk crash or formatting of PC),
mention the same and send the query through ‘Query manager’.
In registered copy of the software,
go to ‘Tools’ menu → Surrender
Registration → click on ‘Yes’
→
then click ‘Ok’.
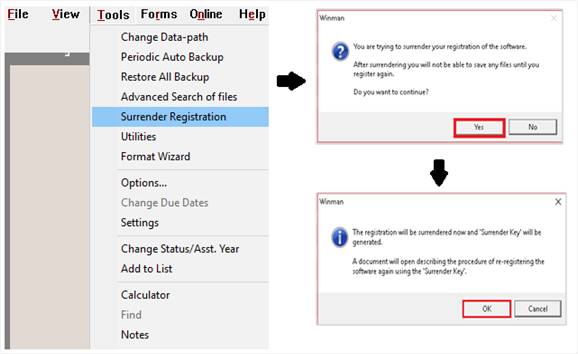
A document (Surrender
code.rtf/.txt) will be generated and
saved in desktop automatically, which contains the
Surrender Key and the steps to register the software later using the Surrender
Key. Follow the instructions provided therein.
Note: If server registration and
additional licenses are used in network PC, then it needs to be surrendered in
Server PC itself as per the above procedure.
|
If PC is connected to
Internet: |
⇒ Different PC
·
Open the website → https://www.winmansoftware.com from the PC in which installation is
required
·
In the ‘Downloads’ page, under ‘Express Installation’ click on download
icon appearing next to the software name
·
Double click on ‘WinmanCAERPdownloader.exe’ /
‘WinmanTDSSetupDownloadfile.exe’ as applicable, to install the software.
⇒ Current PC / Different drive
|
Winman
CA-ERP & GST: click here Winman
TDS: click here |
|
This is the ‘Express Installation’ of the
software (to know more, click here).
If PC is not connected to Internet:
Download the setup file using links given
below. Copy the downloaded ‘WinmanCAERPdownloader.exe’ /
‘WinmanTDSSetupDownloadfile.exe’ to the required PC. Then, double click on the
file to install the software.
Winman
CA-ERP & GST: click here Winman
TDS: click here
•
How to Reset GSTR-1 / IFF data in
software? OR How to delete all data uploaded to GSTR-1 /
IFF in single click?
Please note, on doing Reset,
e-invoice details which are auto-populated in GSTR-1 will also be deleted from
the portal & the same cannot be retrieved again.
To watch training video on
this feature, click here or go to ‘Help’ menu → Training Videos → under ‘Data Entry’ head → ‘Reset GSTR-1/ IFF Data’.
To reset GSTR-1,
⇒
Go to ‘Forms’ menu → GSTR-1 or ‘IFF (for GSTR-1)’ → Delete all data in GST
Portal (Reset)
OR
click ‘Delete all data in GST Portal (Reset)’ menu under return filing stage given
against ‘GSTR-1 Sales (outwards
supplies) ‘ / ‘IFF - Invoice Furnishing Facility (for GSTR-1)’.
⇒
You will be navigated to GST website.
Click ‘Reset’ button in website.
⇒
All the data uploaded to GST website
will be deleted from website & Software.
The deleted rows will be exported
to a Excel sheet for your reference. You may update
the changes in that Excel and import to the software.
Alternatively, you may
select ‘Yes’ in ‘Delete’ column of each row in software & re-upload the return.
• I am getting error message as ‘Some
errors occurred while excel import and such details are….’ while importing data from Excel to the software. Why?
While importing data from Excel file, some data are not imported to software due to following reasons:
⇒ Invalid
data in Excel: If data entered in Excel
file is invalid (e.g., Invalid GSTIN format, value
is not as per list item etc.), such rows will not be imported to software.
⇒ Duplicate data in Excel:
·
If rows with matching values in key columns are found in
software and Excel, such rows will not be imported from Excel. Importing such
data may cause duplicate data entry in the software.
· If rows with the same 'Invoice No.'/'Credit Note No.' are found in both the software and Excel, or only in Excel, but other details differ except for the customer name, tax rate, taxable value, and tax amounts, those rows will not be imported from Excel.
The not imported rows will be exported to a new Excel file, where the cells having invalid data will be highlighted in light blue colour & duplicate rows will be highlighted in light pink colour. You may make necessary correction in that Excel file & import the data to software using Excel import option.
If the data existing in software is not correct,
please delete such rows and then try to import the data from Excel file. Click here for the procedure of
deleting rows.
Note:
·
Key columns are - GSTIN, Invoice no. and Tax rate.
·
In tables not having GSTIN & Invoice no. column,
key columns are -State of supply and Tax rate.
·
In tables having details of Credit/Debit notes, key
columns are – GSTIN, Credit note no. and Type of document.
·
In ‘HSN summary’ table, key columns are – HSN, Tax
rate and Unit of measurement.
Go to 'Forms' menu → GSTR-1A (file online).
• How to generate Annual summary of GSTR-1 and GSTR-3B?
To generate GSTR-1 annual summary, click here.
To generate GSTR-3B annual summary, click here.
• How to
download GSTR-3B data to software?
To download GSTR-3B data,
·
Click ![]() picture given against 'GSTR-3B Summary return' row.
picture given against 'GSTR-3B Summary return' row.
Or
·
Go to 'Forms' menu → GSTR-3B → Download data – Import to software.