![]()
·
How to create a
revised e-return?
·
How to create or
file a correction return?
·
Duplicate deductions are entered in the original
return. How do I correct the same?
·
How to
do e-filing / online filing of TDS / TCS returns?
·
How to
upload TDS / TCS regular or correction returns in Income tax e-filing website?
·
How to download
‘Consolidated FVU file’?
·
How to Request and
Download consolidated FVU / 16A / 16 / Default file using DSC?
·
How to send request for
consolidated FVU file with DSC?
·
How to do mass download
of consolidated FVU files from TRACES website?
·
Can I download all the
requested consolidated FVU files at a time?
·
How to register TAN
in TRACES website?
·
How to view / download
the e-return acceptance or filing status?
·
Can I view the
e-return acceptance status of all the TDS returns submitted to NSDL Centre?
·
How to view /
download e-return processing status in TRACES website through Software?
·
How to add new Challans and
their respective deductions in Revised return?
·
While adding challan, paid challans are not
shown in the list in TRACES website. Why?
·
How to make online
correction / add new Challan for an old Financial
Years TDS / TCS return?
·
How to check status of
Add Challan / Online correction?
·
How to manually check
the online correction status in TRACES website?
·
Add challan
request not completed what can be done next?
·
Software is displaying
as ‘Unregistered Copy’.
·
How to get registration
/ activation key for Unregistered copy of the
Software?
·
How to register the
software after the PC being formatted or changed?
·
Error message appears as
“Error encountered while performing registration”
·
How to re-register the software using Surrender Key after
formatting or changing PC?
·
How to surrender the license before formatting / shifting
the software?
·
How to surrender the additional licenses?
·
How to get Registration Key?
·
How to send
Computer key of software installed in different PC for registration?
·
I want to install one more copy of the software.
·
I want to buy additional license of the software.
·
How to install
additional software?
·
How to make payment
towards purchase of Additional software?
·
How to obtain the
license to another PC?
·
How to download /
install the software?
·
How to download / install the software if the PC does not
have the Internet connection?
·
How to register Digital
Signature Certificate (DSC) in IT e-Filing website?
· How to register Digital Signature Certificate (DSC) with TRACES website?
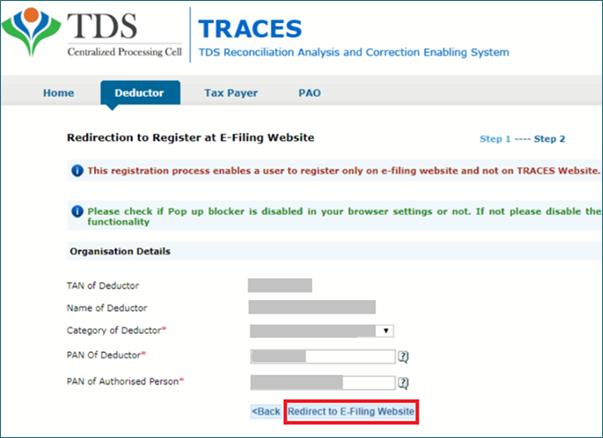
· How to register as a new user in IT e-filing website, for filing TDS returns?
· Error appears as “User ID does not exist, Please Retry”.
· I have already registered my TAN in IT e-filing website. How to activate this account?
· Your registration request is pending with PAN of the organisation
· Can I download provisional receipt for the returns uploaded in old IT e-Filing website?
· What is the procedure for creating / filing TDS returns in NSDL?
· In case of Regular / Correction return, what are the documents to be submitted to NSDL?
· How to submit offline filing?
· How to generate e-return / FVU file / Form 27A?
· How to generate 27A without IT TAN login? ‘.csi’ file is not getting attached automatically?
· How to generate e-return manually?
· How do I start with Winman TDS?
· How to download Challan details from NSDL/IT website through Winman TDS?
· How to get / import details of Challans paid in IT/ NSDL website?
· If TDS of two quarters is deposited in a single Challan, how to enter the data?
· Whether single challan can be used to pay tax amount, interest amount and late fee amount?
· I want Challan Consumption details from TRACES website.
· How can I check the balance amount / unutilized amount available in a particular Challan?
· How to place online request for Refund of TDS?
· How can I send TDS data entered in the software to a client?
· How to get the details of the deductor / deductee / challan / deduction / salary in Excel
· How to export the quarterly or yearly (annual) data from the TDS file to Excel?
· How do I get Deductee-wise, challan-wise, section-wise, report from a TDS file?
· How to get details of Section 206AB Applicability and PAN Status in Excel?
· How to generate 3CD report in Winman TDS?
· How to unzip the ‘Consolidated FVU file’ downloaded from TRACES?
· What is the password to unzip the ‘Consolidated FVU file’?
· Can I get the list of filed / not filed TDS returns for the current Financial Year?
· How to generate ‘e-Return filed / not filed report’?
· How to check whether quarterly TDS return of a particular quarter is filed or not?
· How to download Consolidated FVU files using DSC?
· How to download previous quarter/financial year details from TRACES?
· How to download deductor details, if return is not filed from the software?
· Not able to import the data from FVU file to Winman TDS.
· How to import the data from e-return files (like .txt, .tds files)?
· How to import data from other TDS return filing software to Winman TDS?
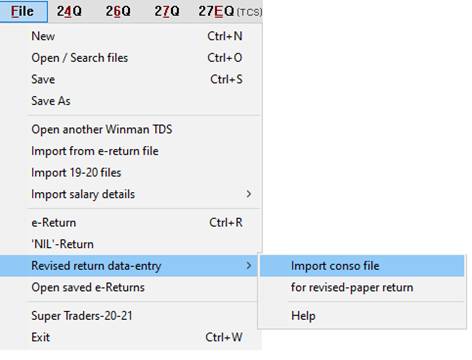
· How to import Consolidated FVU file for creating revised return?
· Not able to delete the Challan in revised return.
· How to add or modify deductees through online correction?
· I have paid Challan for wrong Assessment Year / Major Head / Section Code. How to rectify?
· Return details are not available
· ‘Return details’ sheet is blank in 3CD report. Why?
· What is the due date for filing quarterly TDS / TCS returns?
· The return got rejected by the TRACES with reason as "latest conso file not used …".
· I am not able to select the import option ‘Overwrite all’ while importing the data from Excel file.
· How to make corrections in excel for the revised return?
· Where does the downloaded consolidated file get saved?
· How to make payment of late filing fee u/s 234E or interest as per the notice?
· Challan utilisation balance is wrongly shown. Why?
· Negative Challan balance is shown.
· ‘Amount Utilised’ is more than the value in Deduction window.
· Error appears as ‘Total of deductions of the challan exceeds the challan amount!’.
·
There is difference in Challan
balance shown in TRACES website and in software. Why?
Winman-TDS
![]()
To watch the
training video on Revised return, click here
or go to Help menu
→ Training Videos → ‘How to file Revised return?’.
Note: Addition of challan
is not allowed in Correction statement(s). In case of addition of challan in revised return, 'Add Challan'
procedure to be done before consolidated FVU is downloaded (step 1). For the
procedure to add new Challans in Revised return, click here.
Step1:
Download the ‘Consolidated FVU’ file
Click here for the detailed procedure.
Step2:
Import the ‘Consolidated FVU’ file downloaded in Step1
Step3: After importing Consolidated FVU file, do all the necessary
corrections / additional entries, if any.
Click here to know more about correction after
importing consolidated FVU file.
Step4:
Generate Revised e-return

OR
Step 5:
Upload Revised return
To know the procedure to upload Revised e-return Click here.
Note: Filing procedure is same for both regular
and revised return.
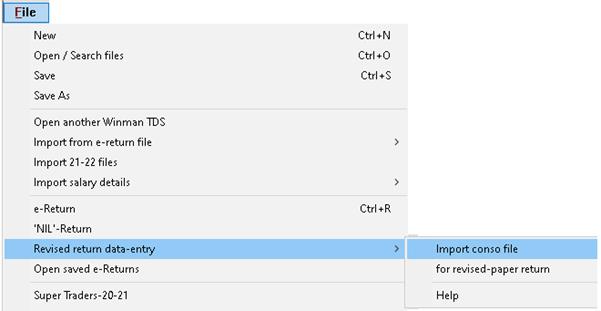
•
How to do correction in revise return
after importing consolidated FVU file and upload of revise return? OR Duplicate deductions are entered in
the original return. How do I correct the same?
If there are more corrections in Deduction /
Salary, then you can use ‘Excel Import/Export’ option. Click here to know the
procedure.
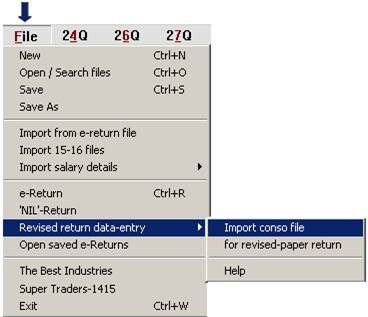
However, in case of corrections in Deductee / Deduction / Salary records, then you may import
consolidated file using ‘File’ menu → Revised return data-entry → ’Import conso file’ and follow the below
procedure.
⇒ For Adding new records:
·
Deductee window:
Add in Deductee window and select same deductee / employee in Deduction / Salary window against
particular Challan.
·
Deduction window: Select required deductee
name against particular challan and enter deduction
details.
·
Salary window: Select required employee name and enter
salary details.
⇒ For Deleting existing records:
·
Deductee window:
You cannot delete ‘Deductee’ details in revised
return. Instead, delete the deductions entered for that deductee.
·
Deduction / Salary window: Select the particular column to be deleted
and then click on ![]() button shown on
the left side of the window.
button shown on
the left side of the window.
⇒ For Changing existing records:
Make necessary changes in required window
by first deleting the entered field (using ‘Delete’ key) and then enter the
required data.
·
Deductee window:
For Deductee /
PAN correction, make changes in 'Name’ / ‘PAN' field.
·
Deduction window:
ü For amount / date corrections: ‘Amount Paid
/ Credited’, ‘Paid /
Credited Date’ or ‘Deduction
Date’.
ü For change in Section: Select required list
from dropdown of ‘Section’ field.
⇒ For uploading Revised return:
For the procedure to upload Revised e-return, Click here.
Note: In original return, if tax has been
deducted at applicable higher rate due to non-availability of the PAN, then
changes are limited to the cells – ‘PAN’, ‘Amount Paid / Credited’ and ‘Paid / Credited Date’ in the Revised return. As per the NSDL rules, you cannot change any
other values in a Revised return.
You can upload the TDS / TCS regular or correction
returns either using a valid Digital Signature Certificate which is registered
in the IT e-filing website or using an Electronic Verification Code (EVC).
To watch the training video on this feature, click here.
Steps for e-filing of TDS / TCS return:
Step 1: If you have not yet registered your TAN in the IT
e-filing website, click here for the procedure of the same.
Note:
Even if your TAN is registered in TRACES site, for e-filing of TDS / TCS
return, it is mandatory to register your TAN in the IT e-filing website.
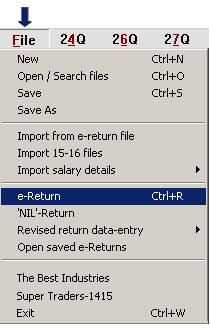
Step 2: Open the relevant TDS
regular or correction file and go to ‘File’ menu → e-Return → click
on ‘Generate / validate e-return’.
Step 3: In the ‘E-return’ window, click ‘Upload’ button. Alternatively, you
can go to ‘Online’ menu → Online Filing → ‘Upload e-Return’.
Step 4: You will be logged into e-filing account, details
will be auto-filled and FVU zip file will be attached. Verify the details and
click on ‘Proceed to E-verify’.
Step 5: Select the option through which you wish to verify
the Return
·
Through EVC option: OTP will be sent to
registered Mobile number, enter the OTP and submit.
·
Through DSC: Select the 'Provider',
'Certificate' and enter Password. Click 'Sign' and submit the return.
Note:
⇒
To verify using DSC, DSC needs to be registered in IT
e-filing site. Click here to know the procedure to register DSC.
⇒ If TAN is not registered in
IT e-filing website you can also submit the return offline to any TIN
facilitation centre. Click here for the procedure.
•
How
to download ‘Consolidated FVU file’?
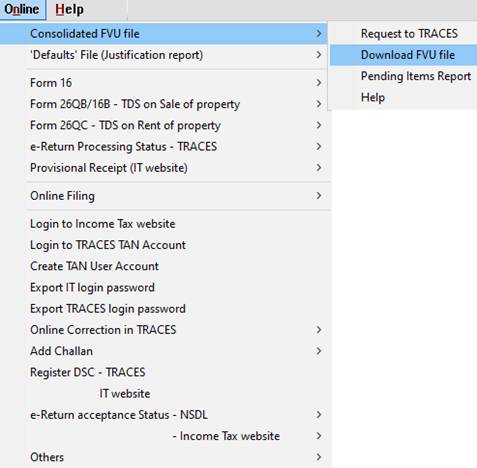
Step 1: Make a
request
Open the relevant file and quarter → click on the menu as shown below
Note: You can place request
for Consolidated FVU file, only if you have created TAN User Account. Click here to know the procedure of creating TAN User Account.
Step 2: Download
and Unzip
Within 24
hours, the ‘Consolidated FVU file’ will be available for download in TRACES. To
download:
You can download more than one Consolidated FVU file at a time i.e., you
can download requested Consolidated FVU files of all the Winman
TDS files in a single click. For more details, click here.
Step 3: Import Consolidated FVU file
To import the downloaded
Consolidated FVU file to Winman TDS for Revised
return:
For the procedure
to download Consolidated FVU file with DSC, click here.
•
How to Request and Download consolidated FVU / 16A / 16 / Default
file using DSC? OR How to send request for consolidated FVU
file with DSC?
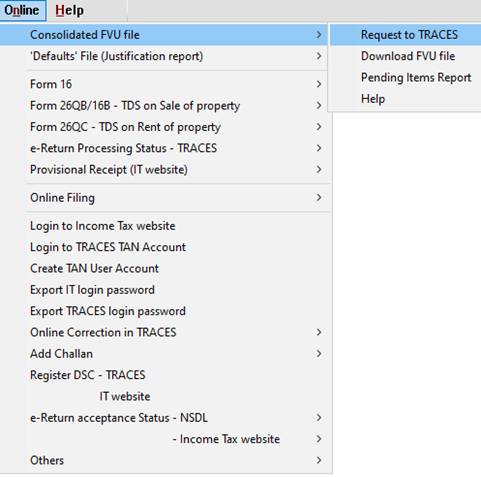
Step
1: Give request for relevant file.
Go to 'Online' menu → Consolidated
FVU File →
Request
to TRACES.
Under ‘PRN (Original Return)’ enter any quarter or any F.Y. filed return Token
Number and click on 'Continue' to proceed.

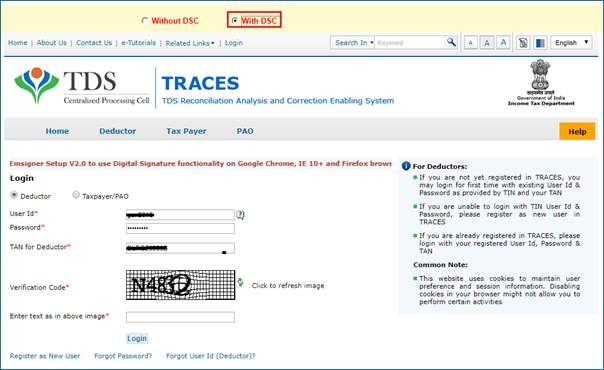
Step 2: Select the option ‘With DSC’
Before login, tick on the option ‘With DSC’ as shown below
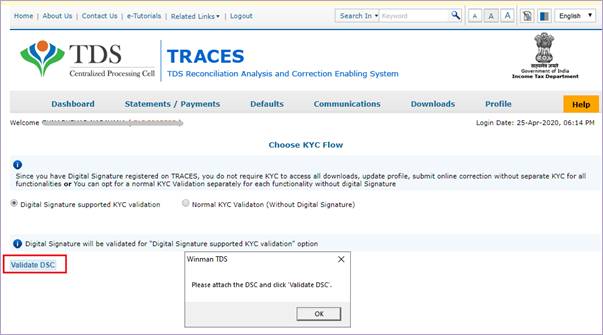
Step
3: Attach your DSC which is registered in TRACES profile.
After login, attach your DSC and click on ‘Validate DSC’ as
shown in the below picture.
After DSC validation, relevant request number will be
generated.
All the requested Consolidated FVU files
can be downloaded automatically through the software at a time. That is, after
placing the requests for Consolidated FVU file, the following action will be
done by the software automatically once in a day at the time of opening the
software:
·
A Report containing the list of ‘Consolidated FVU file’ requests along with status and instructions
to the users, if any, will be shown. You can also open the report using Online menu → ‘Consolidated FVU file’ → ‘Pending Items Report’.
·
When Yes is clicked for the message which appears on clicking
the above mentioned menu, if the requests for Consolidated FVU file are
accepted, the software will download all those Consolidated FVU files
automatically. Once, the files are downloaded, the software will inform the
users in Instructions
column of the Report stated above.
• How to
register TAN in TRACES website?
⇒ Go to ‘Online’ menu in Winman
TDS → ‘Create TAN User Account’. Enter the required data and click ‘Proceed’; enter all the details
manually as the same will not be auto-filled.
⇒ On registration of the
TAN, TRACES will send an e-mail containing an activation link & code to the
e-mail ID registered with TRACES. An SMS containing activation code will
also be sent to your Mobile number provided at the time of registration.
⇒ Within 24 hours of receipt
of the e-mail, you have to click on the activation link given in the e-mail and enter
the User ID and activation codes.
⇒ On successful activation,
you can login to the TAN User account.
For the procedure to register as a new user in IT e-filing
website, for filing TDS returns click here.
Note: To register the TAN in TRACES website, details of
already filed TDS return needs to be furnished. Otherwise, error appears while
registering the TAN. Therefore, file the TDS return for any one quarter and
then try to register the TAN.
Please note that, if return is already submitted, it may take
up to 7 days to be processed in TRACES website. Even after 7 days of submission
if same error appears, check the e-return acceptance status in Protean/NSDL or
IT e-filing website. To know the procedure, click here.
• How
to view / download the e-return acceptance or filing status?
Click on the below links to
know the procedure to view or download e-return acceptance status from:
⇒ NSDL
To view or download e-return
processing status from TRACES website, click here.
• How to view / download the e-return acceptance status of TDS returns filed in IT
e-filing website through the software?
You can check
the status directly in IT e-filing website as given below:
To view the TDS e-return acceptance status of the current Deductor:
Go to ‘Online’ menu → ‘e-Return acceptance Status – Income Tax website’ → ‘View’.
To download the status:
·
Go
to
‘Online’ menu → ‘e-Return acceptance Status – Income Tax website’ → ‘Download and save’.
·
Enter
the Captcha code and click ‘Login’.
·
Now,
the status will be downloaded and saved automatically.
To view the saved report of downloaded
e-return status:
Go to the ‘Online’ menu → ‘e-Return acceptance Status – Income Tax
website’ → ‘Show saved status
report’.
• How to
view the e-return acceptance
status through the
software, if return is submitted to NSDL Centre? OR
Can I view the e-return acceptance status of all the TDS returns submitted to NSDL Centre?
E-Return
acceptance status of all the TDS returns submitted to NSDL Centre can be viewed
using 'Online' menu → e-Return
acceptance Status – NSDL → 'View'.
To download the e-return acceptance status
of the current Deductor, go to ‘Online’ menu → ‘e-Return acceptance Status – NSDL’ → ‘Download and save’. In ‘e-Return Status
Check’ window, enter
the PRN of required Forms and Quarters and click ‘Continue’. Now the
status will be downloaded and saved.
Please note that, if you
enter the PRN of more than one Form/Quarter, then the data of all those
Forms/Quarters will be downloaded and saved.
To view the report of e-return
status of all those Deductors, whose data has been
downloaded, select ‘Show saved status report’ under
‘Online’ menu → ‘e-Return
acceptance Status – NSDL’.
• How to view / download e-return processing status in TRACES website through
Software?
⇒ To view e-return processing
status in TRACES website: Go to Online menu →
e-Return
Processing Status – TRACES → View.
⇒ To
download the e-return processing status: Go to Online menu → e-Return
Processing Status – TRACES → ‘Download and
save’.
⇒ To
view the saved report of downloaded e-return processing status: Go to Online menu → e-Return
Processing Status – TRACES → ‘Show saved
status report’.
To watch training video on this feature, click here. The processing status of
TDS/TCS return will be available in TRACES website after 3 days from the date
of acceptance of e-return by NSDL/IT website.
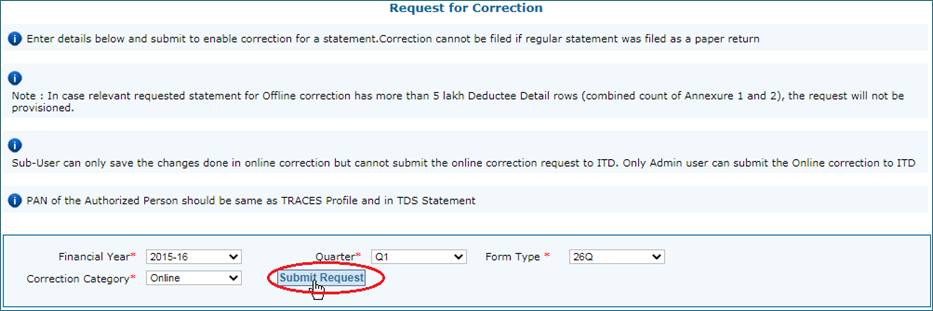
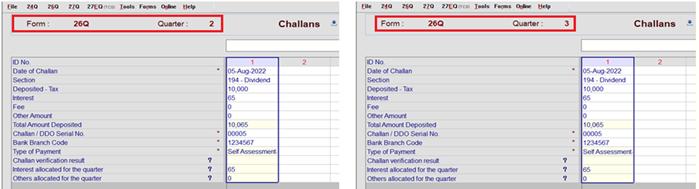
• How to add new Challans and their respective deductions in Revised
return?
As per the File format and FVU of
NSDL, addition of new Challans in Correction Statement is not allowed now. To add new Challans and their respective
deductions in Revised return, follow the below steps:
(To watch the training video on this
feature, click here or go to ‘Help’ menu → Training Videos → ‘Add Challan online’.)
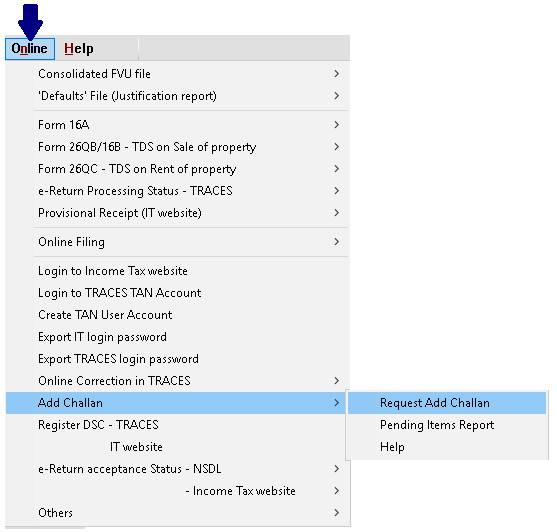
Step 1: Add new Challans
·
Submit online
correction request to TRACES
Go to ‘Online’ menu → Add Challan → 'Request Add Challan'.
·
All the details will be auto-filled by the software. Click on ‘Submit Request’. In the next page click on Proceed.
·
You will be navigated to ‘File Correction’ page of TRACES website.
You can add new Challans, only after the
details of Challans are available in NSDL website
(OLTAS). Click on the relevant Challan row and click ‘Add Challan
To Statement’.
Note: Once the Challan
is paid, around 6-7 days are required for the same to get updated in TRACES
website. Therefore, wait for 6-7 days and then do 'Add Challan'
procedure.
While adding challan, if the required challans are not found, click here to know the reason.
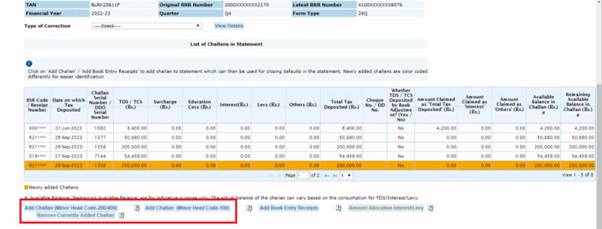
·
Click
on ‘Save’ at the bottom of the page.
·
After saving one challan,
you can follow the same procedure to add more challans.
·
List
of Challans which are available in the TDS
statement along with the newly added Challan will be
displayed. If you want to add another new Challan,
click on ‘Add Challan’. Otherwise, click on ‘Submit Correction Statement’.
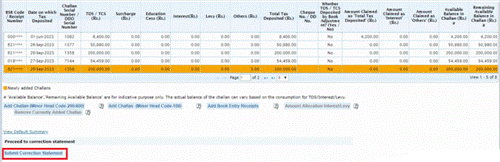
·
Now,
your Online correction request is submitted
successfully.

After
completion of the step-1, the following actions will be done by the Winman TDS automatically once in a day at the time of
opening the software:
·
A
report containing the list of ‘Add Challan’ requests and ‘Consolidated FVU file’ requests along with status and instructions to the users, if any, will
be shown. You can also open the report using 'Online' menu → Add Challan → ‘Pending Items
Report’.
·
If
the status of Correction request is ‘Processed’, the software will automatically place a request for Consolidated FVU
file. Please note that around 24-48 hours are required for the correction request
status to be displayed as Processed in the TRACES website. To check the status of
correction manually, click here.
·
If
the request for Consolidated FVU file is accepted, the software will download
the Consolidated FVU file automatically. Once, the file is downloaded, the
software will inform the users in Instructions column of the
report stated above. Now, you can proceed to the step-2.
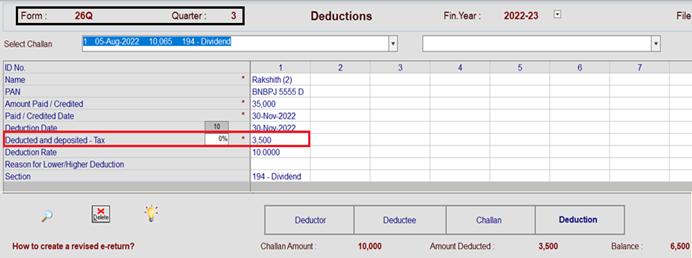
Step 2: Add deductions for new Challans
Import
the auto-downloaded Consolidated FVU file to Winman
TDS and add the deductions for the new Challans in
revised return using 'File' menu →
Revised return data-entry → ‘Import conso file’. Click here to know the procedure.
To make online correction / add new Challan for
an old Financial Years TDS / TCS return, click here.
Note: If the Challan contains only payment of interest / late filing
fees, then step-2 is not necessary.
•
While adding challan, paid challans
are not shown in the list in TRACES website. Why?
If Challan
is not shown in the website, please check below points:
·
Once the Challan
is paid, 6 to 7 days are required for the same to get updated in TRACES
website.
·
Change Financial
year from dropdown and click ‘View details’ and check.
·
If there is no sufficient balance
amount available in the Challan, check consumption
details, click here.
·
Excess amount of TDS paid in the
previous Fin. Year can be utilised only in the immediate next Financial year.
•
While
sending request for online Challan correction / PAN correction, error
message appears as ‘Online correction on TRACES is not enabled for the
requested statement. Kindly file correction through NSDL and the subsequent
correction can be filed on TRACES’. OR How to make
online correction / add new Challan for an old
Financial Years TDS / TCS return?
As per the
solution provided by TRACES, the online Challan
correction / PAN correction can be done, only after processing the Revised
return submitted to the NSDL by making corrections in Deductor’s
details (i.e., C1 corrections). Click here
to know the procedure.
Hence,
download the Consolidated FVU file from TRACES and do C1 corrections (i.e., corrections / updations related to PAN of responsible person, address details, etc.) as
applicable, and then generate and submit the Revised
return. After processing of this Revised return, send
fresh request for online Challan correction / PAN
correction.
For the detailed procedure to file Revised return, click here.
• I have Added Challan / done online correction against default notice, but still default notice is not cleared. Why? OR How to check status of Add Challan / Online correction? OR How to manually check the online correction status in TRACES website? OR Add challan request not completed what can be done next?
Check
status of Add Challan / Online correction:
To check the status
manually, go to ‘Online’ menu → ‘Login to TRACES
TAN Account’. In TRACES website, click on ‘Defaults’ → Track Correction Request → View All.
⇒
If the status is shown as ‘Processed’ give a new request to consolidated
FVU file and import to the software. Do necessary correction and file revised
return. Click here to know the procedure of revise return.
⇒
If the
status is shown as other than ‘Processed’ such as ‘Available’ or ‘In Progress’, that means your
Online correction/Add Challan is not completed. Click
on ‘Available’ or
‘In Progress’ and
complete the Online correction/Add Challan
procedure or cancel that request and raise a new Online correction/Add Challan request under Online menu.
⇒
If the Status is shown as ‘Submitted
to Admin User’ then insert DSC and complete the Add Challan
procedure. Wait for the status to be processed. If DSC is not registered in
TRACES website, click here.
To know the meaning
of status, please refer the table given below.
|
Status |
Remarks |
|
Requested |
When
user submits request for correction |
|
Initiated |
Request
is being processed by TDS CPC |
|
Available |
Request
for correction is accepted and statement is made available for correction.
User can start correction on the statement. Hyperlink to be provided on this
status, clicking on which will take user to KYC specific screen. Once user
clicks on request with 'Available' status, status of request / statement will
change to 'In Progress' |
|
Failed |
Request
cannot be made available due to some technical issues in data loading or
because another correction statement was submitted for the same criteria. User
can submit new request for correction |
|
In
Progress |
User
is working on a statement. Hyperlink to be provided on this status, clicking
on which will take user to KYC specific screen. |
|
Submitted
to Admin User |
Sub-user
/ Admin User has submitted correction statement to Admin User |
|
Submitted
to ITD |
Admin
User has submitted correction statement to ITD for processing |
|
Accepted |
Statements
has been accepted by TDS CPC for processing |
|
Rejected |
Statement
has been rejected by TDS CPC after processing / if the statement is
cancelled. Rejection reasons to be provided in 'Remarks' column |
|
Processed |
Statement
has been processed by TDS CPC (either for Form 26AS or for defaults) |
|
Cancelled |
Statements
that are cancelled by user |
• Software
is displaying as ‘Unregistered Copy’. OR
How to get registration / activation key for Unregistered
copy of the Software? OR How to register the software after the PC
being formatted or changed? OR Error message appears as “Error encountered
while performing registration”.
Software
will display the text ‘Unregistered Copy’ in following cases. Registration process is
mentioned therein.
⇒
License is surrendered:
If the license is surrendered using ‘Tools’ menu → ‘Surrender Registration’, Click here for the procedure to register the software
again.
⇒ Hard disk crash/PC is formatted or changed (license is
not surrendered):
In such case, to obtain registration
code, please mention the reason for not surrendering the license (i.e., about
hard disk crash or formatting/changing of PC) in the query and send through ‘Query manager’.
⇒ New additional license Purchased:
In case of online payment, go to 'Help' menu → Registration → select ‘Online’ option → enter 6 or 8 digit serial number of
existing software copy against ‘I have Surrender key/Access Code’ → click on ‘Register’.
If payment is done through a mode other than ‘Online payment through Winman’, you need to send payment details to us using 'Help' menu → ‘Send Payment
Details’.
⇒
Software is installed but not
Purchased/Registered:
Software will be displaying as ‘Unregistered Copy’ if software is
installed but not purchased/registered. To buy license, go to 'Help' menu → ‘Buy now’.
To register, go to 'Help' menu → Registration → select required option.
⇒
Other than above reasons:
Please mention the reason
for un-registration in your query and send it through 'Query
manager'.
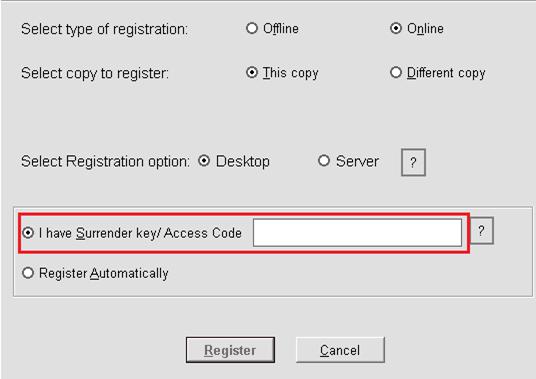
• How to
re-register the software using Surrender Key after formatting or changing PC?
After formatting, when you open the
software in same PC for the first time, a message relating to re-registration
will appear. Click ‘Yes’ to register. Alternatively, you
can follow the below mentioned steps to re-register:
In case
of re-registration in different PC,
⇒ For PC having internet
connection:
Step 1: Go to ‘Help’ menu in the software → ‘Registration’.
Step 2: Select ‘Online’ option → enter the Surrender key
against ‘I have Surrender key/Access Code’ → click on ‘Register’. Winman CA-ERP/Winman TDS will get
registered automatically.
⇒ For PC not having internet
connection:
From a PC having internet
connection, send the ‘Surrender key’ and ‘Computer Key’ through ‘Query manager’ tool available under ‘Help’ menu or click ![]() picture. ‘Registration Key’ will be communicated to you.
picture. ‘Registration Key’ will be communicated to you.
Note: However if license is not surrendered before
formatting or changing PC (due to hard disk crash or formatting of PC), mention
the same and send the query through ‘Query manager’.
In registered copy of the software, go to Tools menu → Surrender Registration → click on ‘Yes’ → then click ‘Ok’.
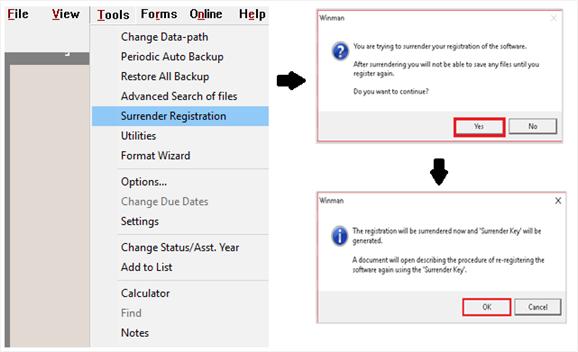
A document (Surrender
code.rtf/.txt) will be generated and saved
in desktop automatically, which contains the
Surrender Key and the steps to register the software later using the Surrender
Key. Follow the instructions provided therein.
Note: If
server registration and additional licenses are used in network PC, then it
needs to be surrendered in Server PC itself as per the above procedure.
⇒
To obtain the Registration Key,
Open the software in the PC in
which you want to register/upgrade the software. Send a request to
register/upgrade using ‘Query manager’ tool available under ‘Help’ menu of the software or click on ![]() picture. The computer key will be
automatically sent along with the request.
picture. The computer key will be
automatically sent along with the request.
⇒
If Software is not installed in the PC,
If software is not installed
in the PC where you want to register the software, click here for installation procedure. After installation, send request (from
concerned PC) to register the software using 'Query manager'
tool under 'Help' menu.
• How to
download / install the software?
OR How to download / install
the software if the PC does not have the Internet connection?
|
If PC is connected to
Internet: |
⇒ Different PC
·
Open the website → https://www.winmansoftware.com from the PC in which
installation is required
·
In the ‘Downloads’ page, under ‘Express Installation’ click on download
icon appearing next to the software name
·
Double click on ‘WinmanCAERPdownloader.exe’ /
‘WinmanTDSSetupDownloadfile.exe’ as applicable, to install the software.
⇒ Current PC / Different drive
|
Winman
CA-ERP & GST: click here Winman
TDS: click here |
|
This is the
‘Express Installation’ of the software (to know more, click here).
If PC is not connected to Internet:
Download the setup file using links given
below. Copy the downloaded ‘WinmanCAERPdownloader.exe’ / ‘WinmanTDSSetupDownloadfile.exe’
to the required PC. Then, double click on the file to install the software.
Winman
CA-ERP & GST: click here
Winman TDS: click here
For additional software price/payment:
Step1: In the registered
software copy, go to ‘Help’ menu → ‘Buy now’.
Step2: In the e-Purchase
window, enter the quantity of New Additional licenses you want to purchase, in the
‘Qty’
column.
Registration after making payment:
Step1: To know the download /
install procedure of the software, click here.
Step 2: Go to ‘Help’ menu → Registration → select ‘Online’ → enter 6 or 8 digit serial number of existing software copy against ‘I have Surrender key/Access Code’ → click on ‘Register’.
However, if the PC is not
having the internet connection, go to ‘Help’ menu → Registration. Note down the Computer key. Send the Computer key through ‘Query manager’ tool in ‘Help’ menu of the software or click on ![]() picture from PC in which internet
is available.
picture from PC in which internet
is available.
Note: You can open any number
of files in the same PC with a single license (go to ‘File’ menu → ‘Open another CA-ERP’ or ‘Open
Last AY file’).
•
How
to register Digital Signature Certificate (DSC) in IT e-Filing website?
To register DSC at IT e-filing website,
⇒
Go to 'Online' menu → ‘Register DSC
- IT website’. Login IT e-filing website using Responsible
person's PAN.
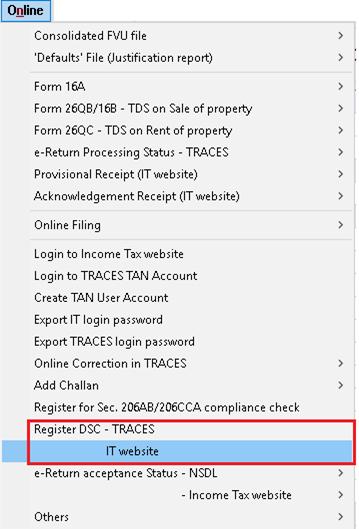
⇒ You will be navigated to Register
DSC page of IT e-Filing website. Enter all the necessary details & click 'Sign'.
Note: For online correction, DSC to
be registered in TRACES. To register DSC in TRACES site, go to 'Online' menu → ‘Register DSC - TRACES’.
• How to
register Digital Signature Certificate (DSC) with TRACES website?
To register Digital Signature in TRACES website, go to ‘Online’ menu → ‘Register DSC - TRACES’.
You will be navigated to Register DSC page of TRACES website.
If the Financial year/Form type/Quarter of the file opened in the
software is not matching with the details shown in the TRACES website, data
will not be auto-filled by the software.
Therefore, open the particular Financial
year/Form type/Quarter as mentioned in TRACES website to auto-fill the details from
the software.
All the details will be auto-filled by the software. Now, click on 'Proceed'.
Click on ‘Register DSC’ as shown
in below picture.

Even if your PAN is registered in IT e-filing website, it is
mandatory to register your TAN in IT e-filing website for e-filing of TDS/TCS returns, Challan download, CSI file download and challan
verification (if paid in IT website).
To
register TAN in IT e-filing website,
·
Go to 'Online' menu →
Online
Filing →
‘Register
at IT e-filing website’. Login page of TRACES
website will be opened
Case 1: If your TAN is registered in TRACES website, enter the
verification code and login. You will be automatically navigated to ‘New User
Registration’ page of IT e-filing website. Enter necessary details and proceed.
Case 2: If your TAN is not registered in TRACES website and
if you are filing for first time, then click 'Register as New user' →
select the type of the user → click 'Proceed'.
⇒ Enter TAN of Deductor, Verification Code and click 'Proceed'. In the
next page, fill necessary details and click 'Redirect to IT filing website'.
⇒ You will be redirected to ‘New User
Registration’
page of IT e-filing website. Enter necessary details mentioned below and
proceed.
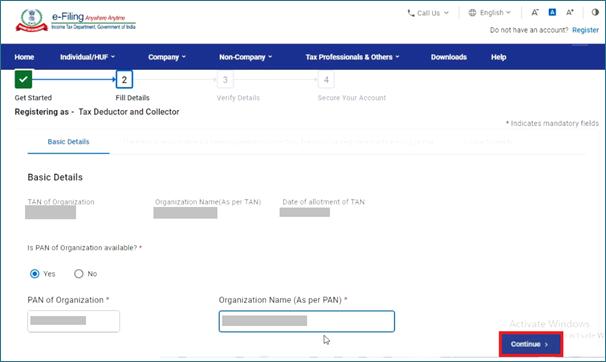
If PAN of the organization is available select 'Yes' for 'Is PAN of
Organization available?' and enter 'Organization Name' same as per PAN and click
on 'Continue'.
⇒ If PAN of the organization
is not available, select 'No', select the reason from drop-down list and then click 'Continue'.
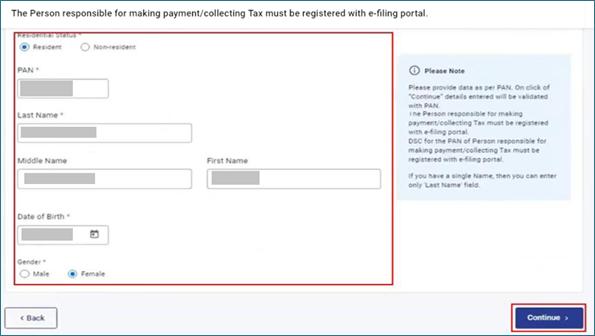
⇒ Enter responsible person's
details and click 'Continue'.
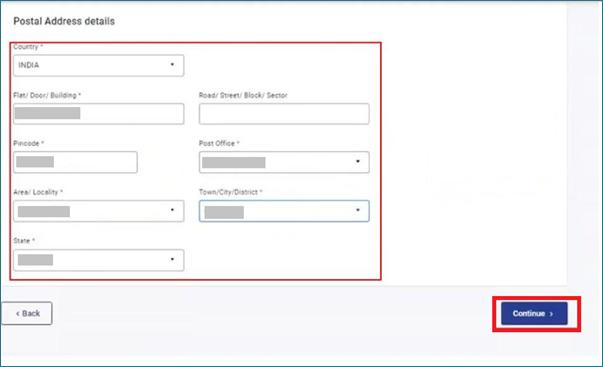
⇒ Enter the contact details
and click on 'Continue'.
⇒ Two separate OTPs will be sent
to your primary mobile number and email ID that was entered previously, enter
both 6-digit OTPs and click on ‘Continue’.
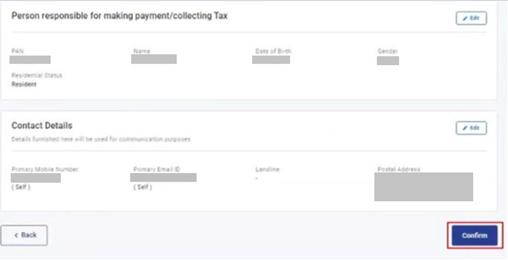
⇒ In next page, review the
details and click ‘Confirm’.
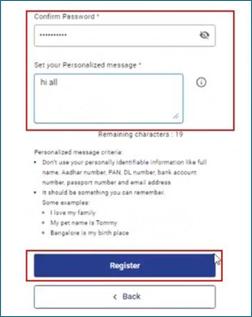
⇒ You will have to set a
password. Enter your desired password and confirm the same. Set your
personalised message and click ‘Register’.
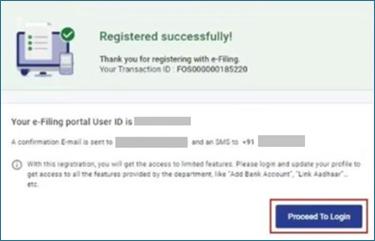
⇒ A success message will be
displayed along with transaction ID, click 'Proceed To Login'.
After registering TAN in IT e-filing website, follow the steps shown in
the website to activate your account or click here
for the procedure.
For the procedure to register TAN in TRACES website, click here.
• I have
already registered my TAN in IT e-filing website. How to activate this
account? OR I have already registered my TAN in IT
e-filing website. But still I cannot login to my IT e-filing account using TAN.
Why? OR Error appears as “The e-filing account
associated with the above User Id has not been activated, kindly activate your User Id to login to
e-filing portal”. OR Your registration request is pending with
PAN of the organisation
After registration
of TAN in IT e-filing website, follow the below steps to activate your account:
·
If you
have entered the ‘PAN of the Organisation’ in ‘Registration Form’, login to Income Tax
website using PAN of the Organization. Under ‘Pending Actions’ → select ‘Worklist’.

Under ‘For Your Action’, approve
the request as shown below.
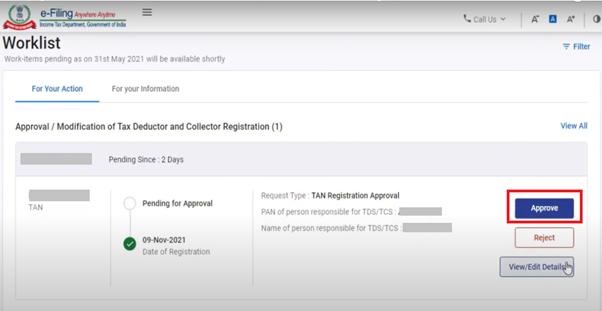
To
login to Income Tax website using “PAN”, click here.
·
If 'PAN of the Organisation' is
not provided, an
activation link will be sent to your registered e-mail ID and One Time Password
(OTP) will be sent to your registered mobile number immediately after
registration.
·
Click
the link received in e-mail and enter the OTP. Your e-filing account will be
activated.
•
Can
I download provisional receipt for the returns uploaded in old IT e-Filing
website? OR I have uploaded TDS return
online in old IT e-filing portal. How do I get my PRN / RRR or Token number to
download Form 16 / Form 16A / Form 27D?
Currently, Provisional Receipt is not given by
the department in IT e-Filing portal after completion of TDS returns. Instead,
Acknowledgement is downloaded.
Acknowledgement receipt does not download for the
return which is filed in old portal. In such case, to get PRN/RRR, go to ‘Online’ menu → e-Return acceptance Status – Income Tax website → ‘Download and save’. In the generated e-return acceptance status report, 'PRN/RRR' will be
available (in 'F' column).
Alternatively, you can also check PRN/RRR under ‘Online’ menu → Others → ‘Provisional Receipt No. Entry’.
• What is the procedure for creating / filing TDS returns
in NSDL? OR In case of Regular / Correction return,
what are the documents to be submitted to NSDL? OR How
to submit offline filing?
For the procedure to enter the TDS
details click here.
For the procedure to create a Correction return click here.
Open the saved TDS file, which needs to be uploaded.
Go to ‘File’ menu → e-Return
→ click
on ‘Generate / validate e-return’. For the procedure to generate
e–return, click here. After successful generation of
e-return, submit the following documents to NSDL Centre.
o FVU file in a Pen drive.
o Hard copy of Form 27A containing signature of responsible person. (refer below picture)

To check the nearest TIN centre, click here.
•
How
to generate e-return / FVU file / Form 27A?
OR How to generate 27A without
IT TAN login? ‘.csi’
file is not getting attached automatically?
OR How to generate e-return
manually?
Open the
concerned TDS file and go to ‘File’ menu → e-Return → click ‘Generate / validate e-return’.
⇒ If TAN is already registered
in IT website, while generating TDS e-return, by default '.csi'
file will be downloaded from IT website.
To register TAN in IT portal, click here.
⇒ If TAN is not registered, a
message will be shown asking to continue with TAN & Mobile number. ‘.csi’ can be auto-downloaded using OTP through provided
mobile number.
⇒ If TAN login details are not
available, forgotten or if the TAN is not activated on the IT
website, CSI
file cannot be auto-downloaded by the software. Please download the CSI file
manually. Click here
for the procedure.
To upload return online, click here.
In case if TAN login details
are not available or forgotten, CSI file cannot be auto-downloaded &
attached by the software. Please follow the below procedure of manual download
of CSI file.
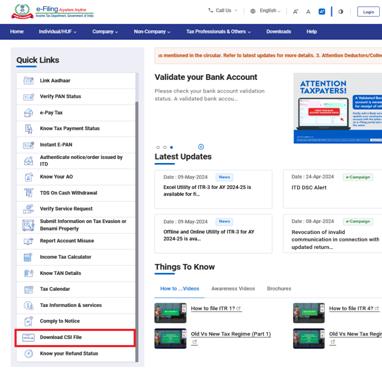
To download the '.csi' without being registered in IT e-filing website:
⇒ Go to IT e-filing portal, under 'Quick
Links' →
click 'Download CSI File'
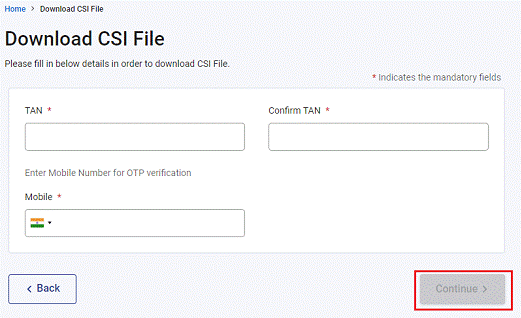
⇒ Enter TAN and Mobile Number in the given
field and click 'Continue'
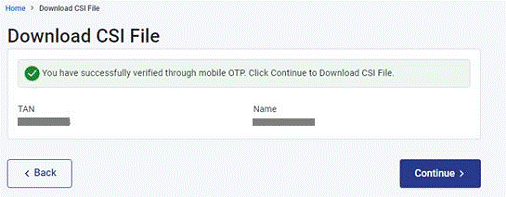
⇒ After successful OTP verification, a right
tick will be shown as below. Click 'Continue'
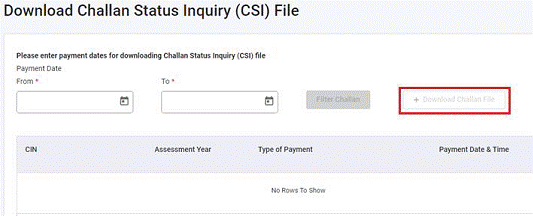
⇒ In appearing page, enter the required
Payment Date and click 'Download Challan File'.
⇒ While generating the e-return, untick 'Re-Download Challan Input
File and use it for FVU validation’ and browse the downloaded CSI File and
proceed.
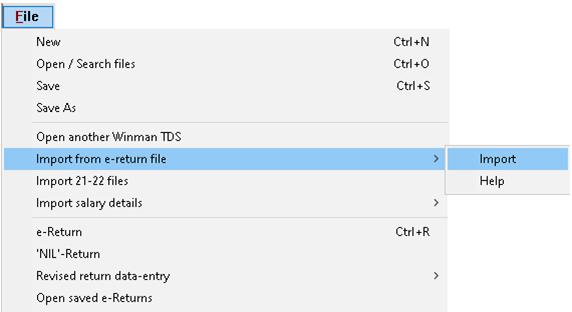
•
How
do I start with Winman
TDS?
To watch the training video on this, click here or go to
‘Help’ menu → Training Videos → ‘How to start with TDS?’
To enter,
⇒
Open Winman TDS and select the
required 'Fin. Year', new file will be opened
⇒
Enter Deductor,
Deductee and Challan
details in 'Deductor', 'Deductee'
and 'Challan' window respectively
Please note,
⇒ You can import basic details
from the ‘.txt’ file of previous original return. To import, go to ‘File’ menu →
Import
from e-return file → Import.
⇒ To download Challan details through software, click here.
⇒
Now, go to 'Deduction' window, select the required Challan under ‘Select Challan’ and enter deduction in
respect of the selected Challan
⇒
After completing the data entry in respect of all Challans, check the correctness of entered data. To check
go to
‘Tools’ menu → ‘Error List’. If any error is shown, double-click on the particular error,
it will locate the column / row in which error exists. Check & make
necessary corrections.
⇒
Then, go to ‘File’ menu → ‘Save’.
⇒ To generate and upload
return, click here.
• How
to download Challan details from NSDL/IT website
through Winman TDS?
OR How to get / import details of Challans paid in IT/ NSDL website? OR Copy of challan
paid in IT website was not saved while making payment. Is there any option to
get challan details of such Challans?
Details
of Challan paid through IT website have to be
downloaded from IT website itself and to download; TAN should be registered in
IT website. Click here
to know the procedure.
To download
Challan details, right click on any cell of the Challan
window and select ‘Download Challans’ →
select 'IT website' or 'NSDL /Protean website' as applicable or click on ![]() picture given next to ‘Challans’ below the menu bar. Click here to watch training video on
this feature.
picture given next to ‘Challans’ below the menu bar. Click here to watch training video on
this feature.
⇒ In case of IT website: Enter the payment date range (as shown below) to download challan
details.
You will be navigated to 'e-Pay Tax' page of IT
e-filing website. Follow the instructions thereon.
⇒ In case of NSDL /Protean website: You will be navigated to
‘TAN based view’ of NSDL website. TAN of the deductor
will be auto-filled from ‘Deductor’ window of the
software. Select ‘Challan Tender Date/Date of Deposit
(Period)’, enter the captcha
verification code and click ‘View Challan details’.
Details will be imported to Challan window.
• If TDS of two quarters is deposited
in a single Challan, how to enter the data?
OR How to adjust the challan details quarter-wise, when the single challan is paid for the entire Financial Year? OR Can excess TDS of one quarter / financial year be adjusted in the subsequent quarter / financial year? OR
Whether single challan can be used to pay tax
amount, interest amount and late fee amount?
As per
the e-return file format, a single Challan can be
used for more than one Section/Quarter/Form/Financial Year as well as to pay
interest & Late fee together.
If
TDS of more than one Quarter/Form is deposited in a single challan
or if there is any excess challan to be utilised for
other Quarter/Form, then
⇒ Enter the same challan details for all the respective Quarters/Forms.
While
entering or adding the challan details, challan amount should not be bifurcated and full challan amount has to be entered in both quarter/FY.
⇒ In Deduction window, select
applicable ‘Section’. The section has to be specified for each deduction
instead of each Challan.
The
'Section' mentioned in Challan window will not be taken to e-return. Hence you can
keep it blank.

To
check the balance/unutilised amount available in a particular challan, click here.
Note:
Excess amount of TDS paid in the current FY can be utilized only in the
preceding and immediate next Financial year (e.g., excess payment of TDS in FY
2022-23 can be utilized in FY 2023-24 only). However, one can apply for refund
of the excess TDS paid. Click here for the procedure.
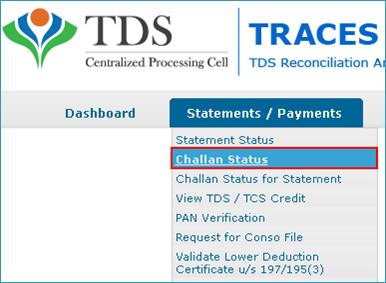
• I
want Challan Consumption details from
TRACES website. OR How can I check the balance amount / unutilized
amount available in a particular Challan?
To get Challan
Consumption details:
⇒ Go
to ‘Online’ menu in the software → ‘Login to TRACES TAN Account’
⇒ After
login, under ‘Statements / Payments’
tab →
select ‘Challan
Status’
⇒ Tick
applicable options as shown in below image and click ‘Go’
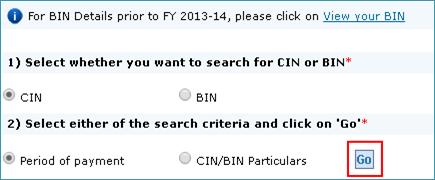
⇒ Under
‘Search Option’ →
against ‘Challan
Deposit Date’ →
enter the date-range in between which Challan is
deposited →
select ‘Challan
Status’ →
click ‘Go’.
Note: Entered dates should
be within same financial year.

⇒ Unclaimed
challans are not fully utilised challans;
the consumption details of the same will not be shown.
⇒ Claimed
challans are those which are fully utilised.
⇒ Select required Challan
and click ‘View Consumption Details’.
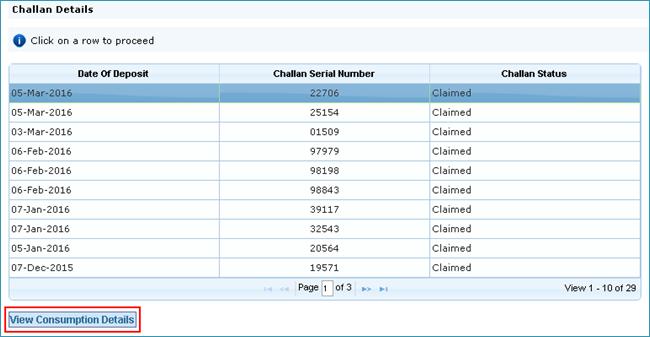
⇒ You
will be asked to enter the amount of Challan. Enter
the same and click ‘Proceed’.
Now, ‘Challan Consumption Details’ will be shown.
• How to place online request for Refund of TDS?
Go to ‘Online’ menu → ‘Login
to TRACES TAN Account’.
In the TRACES website, go to ‘Statements/Payments’ menu → ‘Request
for Refund’.
Note: While submitting the request, attach the DSC which is registered in TRACES website. To register the DSC, go to ‘Online’ menu → ‘Register DSC – TRACES’. for Click here the procedure.
•
How can I
send TDS data entered in the software to a client? OR
How to get the details of the deductor / deductee / challan / deduction /
salary in Excel OR
How to export the quarterly or yearly (annual) data from the TDS file to
Excel? OR How do I get Deductee-wise,
challan-wise, section-wise, report from a TDS
file? OR How to get details of Section 206AB
Applicability and PAN Status in Excel?
Go to ‘Tools’ menu → Excel
Import/Export → ‘Export data only’ and then –
⇒ To export Quarterly data: select ‘Current Quarter’.
⇒
To export Yearly / Annual
data: select ‘Current Year’.
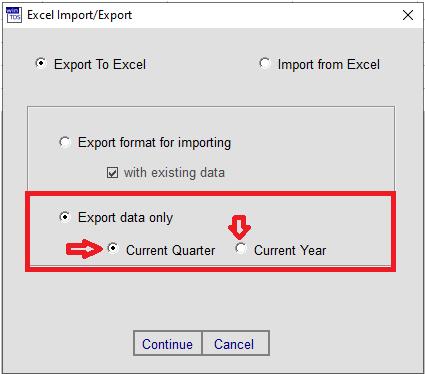
Click ‘Continue’ and save the Excel file. In the exported Excel
file, filter the Deductee / Challan
/ Section details as required. This Excel file can be sent to clients, as
required.
• Received Default showing short collection / Deduction
in case of PAN is inoperative due to non-linking with Aadhaar. OR
PAN status is shown as operative in software, but received default to
deduct tax at higher rate. Why? OR If PAN is inoperative, how to revise and adjust
Short Deduction / Collection details in correction return?
If deductee’s PAN becomes
inoperative due to failure to link with Aadhaar, tax
should be deducted at higher rate u/s 206AA / 206CC. Therefore, it’s important
to check PAN status at the time of tax deduction. If tax is not deducted at
higher rate for Inoperative PANs, Default notice will be sent by the
department, even if PAN becomes operative at a later date.
To check PAN status, right-click on any cell in Deductee window and select 'Get PAN Name & Status'.
Dept. sends default notice charging higher TDS
after 31-May-24, If PAN is not linked to Aadhaar on deduction date. As per the communication with
TRACES helpdesk, even if the PAN is linked with Aadhaar
after filing return, default amount will not be cleared. To clear default
notice, after making default payment, do 'Add challan'
in TRACES.
Click here for the Add Challan
procedure.
After adding challan,
follow the below procedure:
Enter the amount paid and the amount of tax deducted
proportionately in the ratio of TDS deposited.
E.g.: In Original return ‘Amount paid’ is Rs.10,000. TDS is deducted on the ‘Amount paid’ at the rate of
10% (i.e., 1,000) instead of 20% (i.e., 2,000). So there is short fall of
Rs.1000.
In Revised return, in the
‘Deduction’ window, reduce the ‘Amount Paid’ which was mentioned in
Original return till its applicable rate of deduction.
|
Amount Paid/Credited (in Rs.) |
Deduction –Tax (in Rs.) |
Deduction Rate |
|
5,000 |
1000 |
20.0000 |
For
the new Challan
in which the short fall amount is paid, enter the details in ‘Deduction’ window
as follows;
|
Amount Paid/Credited (in Rs.) |
Deduction –Tax (in Rs.) |
Deduction Rate |
|
5,000 |
1000 |
20.0000 |
In case of Form 24Q adjust Amount Paid/Credited as required.
•
How
to import the data to 'Sl. no. 34 TDS / TCS summary, delay in filing returns, interest liability' in 3CD? OR How to generate 3CD report in Winman TDS?
You can generate a TDS report of the Deductor in Excel and import the data to the 3CD window of Winman CA-ERP. To
watch training video on this feature, click here or go to ‘Help’ menu → Training Videos → TDS Report for Form 3CD.
To generate
the report in Winman TDS, follow the below steps:
· Open the TDS file from which you want to generate TDS report for 3CD.
· Download the latest Consolidated FVU files of all four
Quarters of all Forms from TRACES website, if not already downloaded
(For the procedure to download Consolidated FVU files, click here).
· Go to ‘Tools’
menu → Generate TDS report for 3CD → ‘Auto-select
conso files’ (if Consolidated FVU files are downloaded manually, then go to ‘Tools’ menu → Generate TDS report for 3CD → ‘Manually
select conso files’ → select the folder containing
Consolidated FVU files. To unzip consolidated FVU, click here for the procedure.)
A TDS report
will be generated in Excel containing the details required for Form 3CD which
are available in the Consolidated FVU files downloaded from the TRACES website.
To
import data from generated Excel to 3CD window of Winman
CA ERP, go to Winman CA ERP →
Open required table in 3CD window. Right click on the concerned blank row and
click
'Paste from Excel' → 'Overwrite'/
'Add to existing data'.
As
the Return details are not available in Consolidated FVU, the same are not
available in 3CD report generated from Consolidated FVU file. Please enter the
details manually. To get the details of return filed/not filed cases, generate
e-return filed or not filed report, click here for the procedure.
For more
information, refer ‘Help’ sheet of the Excel file
You can download the Consolidated FVU file by
using ‘Online’
menu → ‘Consolidated FVU file’
→ ‘Download FVU file’. If you do so, the software
will automatically unzip the FVU file downloaded from TRACES . However, if you have manually downloaded the same, you can use any one of the following programs to unzip the ‘Consolidated FVU’ file:
⇒
'7-Zip'
version 4.65 or
above.-To download – Click here
⇒
'WinRaR' program version 3.90 or above –To download – Click here
⇒
'WinZip'
version 9.0 or above- To download - Click here
Password to open the zip file is ‘TAN’ of the Deductor followed by ‘_’ sign and latest request number of the
respective form and quarter available in TRACES website. Ex: AAAA11111A_22222
Note:
If the consolidated FVU zip file is received from the A.O. or TRACES dept.,
please collect password from respective person itself. Above mentioned password
will not be applicable in such cases.
From
FY 2022-23, to view the list of filed & not filed TDS returns, go to 'Tools' menu → 'e-Return filed / not filed report .….'. For earlier years, option
is not given, please check in Department website manually. Click here for the procedure.
The
report will be generated in an Excel file with three sheets viz., 'e-Return Not Filed', 'e-Return Filed' and 'Correction Returns'. For more details, refer
'Instructions' sheet of that Excel file.
If ‘Provisional Receipt No. Entry’ is not saved in the software, in the generated Excel, even though the return is filed details will be shown under 'e-Return Not Filed' list. Check and save the PRN/RRR number in ‘Provisional Receipt No. Entry’ field. Click here for the procedure.
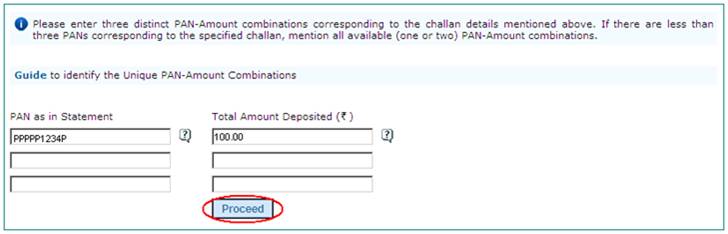
• Error message appears as ‘PAN Amount
combination details entered by you are not valid for the challan details which are provided by you’. OR
‘The challan
details entered by you corresponding to the statement are not valid, enter
valid details’ while requesting for Consolidated FVU file / 16A / 16 / 27D / Default file.
When request to TRACES is made, the
required details will be auto-filled by the software. If TRACES does not accept
these details, then you can follow any of the below procedures.
⇒
Open the latest filed file in
software and check whether same details are present in TRACES website also.
⇒ If Duplicate Challan is present in the
statement, then mention the Challan ID No. of a
particular challan in place of CD record number,
which is filled in the TRACES website i.e., enter 1 for 1st challan, 2 for 2nd challan,
... 10 for 10th challan and so on.
Note: From FY 2022-23 onwards, CD record number will
be auto-filled by the software.
⇒ Alternatively, you can
edit the details manually. You can enter details of a different Challan having at least
three deductions. If no Challan
contains three or more deductions, then enter details of Challan
with maximum deductions. However, the deduction
details should pertain to the Challan entered in PART
1
Note: If the PAN is Invalid or not as per the filed return, do not enter the details. If entered, error
message appears.
Alternatively, you can request for relevant file using DSC. If DSC is
registered in TRACES profile, click here for the procedure. However, it is not
applicable to a new user or if the TRACES login is forgotten.
If the request is not accepted even after repetitive
attempts, then send a mail to TDS CPC to
the e-mail ID ‘contactus@tdscpc.gov.in’.
Following details should be mentioned in your
mail:
Provisional Receipt Number (Token number)
TAN Number, Form No, Quarter & Financial
year
One Challan Details with three deductions and
respective PANs
Print screen of the error page
•
How
to download Consolidated FVU files using DSC?
OR How can I download
Consolidated FVU file of an old Financial Year, when Token number / PRN, Challan details and Deduction details are not available? OR How to download previous quarter/financial
year details from TRACES? OR How to download deductor
details, if return is not filed from the software?
⇒ If your DSC is registered with the TRACES, though PRN, Challan and Deduction details are not available, Consolidated FVU files of such return can be downloaded by submitting ‘Digital Signature supported KYC’. Click here for the procedure.
If DSC is not registered, click here to know the
procedure.
⇒ You can also import data from
e-return file to software, click here
for the procedure.
⇒
For the procedure to import consolidated file in case of
revised return, click here.
•
Not
able to import the data from FVU file to Winman
TDS. OR How to import the data from e-return files
(like .txt, .tds files)? OR How to import data from other TDS return filing software to Winman TDS?
As the Revised File
Validation Utility of NSDL creates encrypted FVU files which can be read only by NSDL, the
data cannot be imported from the new version of FVU files. However, you can import the data from the ‘.txt’ file (refer
below picture) created
while generating the e-return.
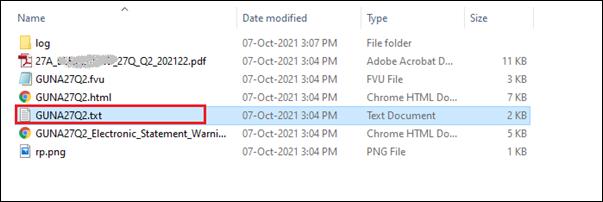
To import the
data from ‘.txt’ file, go to ‘File’ menu → Import from e-return file → Import.
This menu
allows you to import data from ‘.txt’ file
generated in any software, Consolidated FVU file and old version FVU file (version No. 3.2 or earlier).
To watch the training video on this feature, click here or go to ‘Help’ menu → Training Videos → ‘Import data from e-return files’.
• Consolidated FVU file was imported
for creating revised return, but it is showing as Regular return in 27A. OR How to import Consolidated FVU file for creating
revised return?
To import the Consolidated FVU file for the
revised return, go to ‘File’ menu → Revised
return data-entry → ‘Import conso file’.
However, if you have imported the Consolidated
FVU file using ‘File’ menu → Import from e-return file → ‘Import’ option or using ‘File’
menu → Revised return data-entry → ‘for revised-paper return’,
then it will be considered as original return itself.
After
importing Consolidated FVU file, do all the necessary corrections / additional
entries, if any. Click here to know the procedure.
• Not able to delete the Challan in revised return. OR By mistake, I
have added a Challan twice in the process of ‘Add Challan’ for revising the return. How to delete /correct
the same? OR ‘Add challan’
procedure is done, but while importing Consolidated file two challans are reflected instead of one challan.
How to rectify it?
As per the
dept. instructions, you cannot delete a Challan in
revised return. However, you can delete all the related deductions entered, if
any, for the Challan so that the amount utilised becomes ‘Nil’ for that Challan.
If Challan is added
twice or more during the process of adding Challan
online for revised return, then enter deduction details only to one Challan, do not enter for duplicate Challan.
This is because, in case of revised
return, Challan details are not considered if the
respective deduction details are not entered. You
can use the unutilised Challan
in the subsequent quarter/Financial year. To know the procedure, click here.
• How to add or modify deductees
through online correction?
⇒ To add deductees
through Online correction, go to ‘Online’ menu → Online
Correction in TRACES → Request /
Track request.
Select type of correction as ‘Modify / Add Deductee
Details’. For detailed procedure, click here.
⇒ While doing online
correction in TRACES website, Type of Correction - 'Modify / Add Deductee Details' will be available only if Digital Signature is
registered in TRACES website. For the procedure to register DSC, click here.
⇒ If you do not have the DSC, click here for offline correction
procedure.
Note: If status of previous Correction
is shown as 'In Progress' or 'Available', then cancel the same after DSC
registration and submit a new request.
• I have paid Challan for wrong
Assessment Year / Major Head / Section Code. How to
rectify?
To make correction, go to ‘Online’ menu → Login to TRACES TAN Account. Select ‘Request for
OLTAS Challan Correction’ under 'Statements / Payments'. In the next page, tick ‘Financial Year / Major Head / Section Code’ (Enter
new values for only those which need to be changed and
keep others blank) and follow the steps given.
However, correction made through this option will
not be updated in IT Website.
Note:
·
Request for OLTAS Challan
correction cannot be raised within 15 days from the Challan
deposited date.
·
OLTAS Challan correction can be
done only for unclaimed challans.
• Return details are not
available OR ‘Return details’ sheet is blank in 3CD
report. Why?
As the Return details are
not available in Consolidated FVU, the same are not available in 3CD report
generated from Consolidated FVU file. Please enter the details manually.
To get the details of return
filed / not filed cases, generate e-return filed or not filed report. Refer
attached FAQ for the procedure. Click here for the procedure.
To know the due dates to file return, click here.
• What is the due date for filing
quarterly TDS / TCS returns?
The due dates for Form 24Q, 26Q, 27Q and 27EQ are as follows:
|
Quarter |
Due Date of filing |
|
|
Form 24Q/26Q/27Q |
Form 27EQ |
|
|
Q1 |
31st July |
15th
July |
|
Q2 |
31st Oct |
15th Oct |
|
Q3 |
31st Jan |
15th Jan |
|
Q4 |
31st May |
15th
May |
Note: The due date for
filing Form 26Q, 27Q, and 27EQ for the first quarter of FY 2023-24 has been
extended to 30th September, as per CBDT circular No. 09/2023.
• Error message appears as "The consolidated FVU file is not
the latest one. ... " while importing
consolidated FVU files to software.
OR The return got rejected by
the TRACES with reason as "latest conso file not
used …".
Please ensure that the
consolidated FVU file which is being imported for revised return is the latest
one.
If you have done any online
correction (Add Challan or PAN correction), request
for new consolidated FVU file → import the new FVU file to the
software → re-correct again and upload the return.
To check Online Correction Processing status, go to 'Online' menu → 'Login to TRACES TAN Account'. In TRACES website, click on ‘Defaults’
→ Track Correction Request → ‘View
All’. If Correction request is processed, check the processed date
and ensure that consolidated file is requested after the correction request is
processed.
• Error message appears as ‘PAN of Authorised / Responsible Person as
per Personal Information of the correction and as per TRACES Profile should be
same. Please update the PAN of Authorised /
Responsible Person in the correction file’ while doing Online Correction in
TRACES / Add Challan for revised return.
This error
message appears when the PAN of the Responsible Person in correction statement
is either not matching or not found in the profile details of TRACES website.
Therefore, update the ‘Name of Responsible Person’ and ‘PAN’ in the
TRACES website. To do so:
Click on ‘Edit Correction
Statement’ in the error
page → select the ‘Type of Correction’ as ‘Personal Information’
→ click ‘View Details’ → under ‘Particulars of Responsible
Person’ update ‘Name of Responsible
Person’ and ‘PAN’ → click on ‘Save’ button → ‘Submit Correction
Statement’.
In the next page, click on ‘View Statement’ → ‘Submit for processing’
(insert DSC which is registered in TRACES website to
the PC and then submit the correction)
If the Digital signature is not registered in the TRACES website, then
register the same. To register, go to ‘Online’ menu → ‘Register DSC – TRACES’. Click here for the procedure.
• There is difference in Challan balance shown in TRACES website and in software. Why?
In Challan
window, the 'Amount utilised' value includes all deductions used in all the quarters and Forms
of that particular file. The 'Balance' amount in Challan window
may vary from the balance amount shown in TRACES website in following cases:
⇒ Interest & Fee paid will not be included in 'Amount utilised' value, as they
are paid through online correction
⇒ If any Online corrections are done, same will not be reflected in
Software
⇒ If particular Challan details are not
entered in Software
⇒ If amount is utilised for any other Fin. Year
⇒ If separate file is created for a quarter or if other quarter’s
return is filed using other Software
⇒ If data is entered but return is not filed.
•
In case of revised return,
corrections made in the Excel file is not getting imported to the
software. OR I am not able to select the import option
‘Overwrite all’ while importing the data from Excel file.
OR How to make corrections in
excel for the revised return?
In case
of revised
return, only additional Deductee/Deduction/Salary
details can be imported through ‘Excel import’ option. Therefore, corrections
if any, in the existing Deductee/Deduction/Salary
records should be done in the software itself.
Alternatively, if there are more corrections in
Deduction, you can follow below procedure. To watch training video on this, click here or go to 'Help' menu →
Training
Videos → 'Import / Export data from Excel for Revised
return'.
⇒ Import the consolidated FVU
file to the Software
⇒ Delete all the deductions against each of the existing challan in which corrections to be made. To delete, go to ‘Tools’ menu →
Others
→ ‘Delete all data’
(This step is not
applicable, in case of correction in newly added challan)
⇒ Go to ‘Tools’ menu →
‘Excel
Import/Export’
or click on ![]() picture in the menu bar →
Export
format for importing → untick
‘with
existing data’ →
‘Continue’
picture in the menu bar →
Export
format for importing → untick
‘with
existing data’ →
‘Continue’
⇒ In
Excel sheet, add all the deduction details
⇒ Import the Excel file to software.
Go to ‘Tools’ menu → Excel Import/Export →
tick on ‘Import from Excel’. Select the Excel file to be imported →
Append
to existing data → ‘Continue’.
Note: Challan sheet should be blank
in case of revised return.
• Where does the downloaded consolidated file get
saved?
The file will be saved in
the folder in which the relevant ‘Winman TDS’ file
has been saved. Eg:
D:\Winman_Data\Tds Data\201314\ABC Ltd\Consolidated.
• How to make payment of late filing fee u/s 234E
or interest as per the notice? OR
In Correction return, which section is to be selected for the Challan amounts relating to 234E late filing fee and
interest for late payment?
Go to 'Forms'
menu →
'e-Challan'.
The deductor details entered in the software will be auto-filled.
Just fill the required bank details and click on 'Proceed'. To
watch the training video on this feature, click here or go to ‘Help’ menu →
‘Training
Videos’ →
‘Auto-filled
paper and e-challan’.
Note:
·
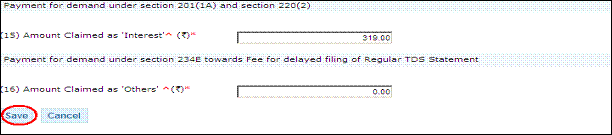
While depositing the interest/tax/fee as
per the notice received from the department, select the ‘Type of
Payment’/‘Minor Head’ as ‘Assessment by Dept-400’.
·
There is no particular section for the
payment of 234E late filing fee and interest on
late payment. Select any section which is in the return.
·
Deduction details are not required if
the Challan amount includes only the amount of late
fee or interest. You need not file the Correction return to add a Challan which is paid towards the late filing fee or
interest. You can add those Challan details through
online in the TRACES website.
For detailed procedure to Add Challan
in Correction return, click here.
·
Once the Challan
is paid, around 6-7 days are required for the same to get updated in TRACES
website. Therefore, wait for 6-7 days and then do 'Add Challan'
procedure.
•
Challan utilisation balance is
wrongly shown. Why? OR Negative Challan
balance is shown. OR ‘Amount Utilised’ is more than the value in
Deduction window. OR Error appears as ‘Total of deductions of
the challan exceeds the challan
amount!’.
OR I
have entered Challan amount & deduction amount
properly, but still a negative balance is being shown in ‘Deduction’ window.
Why?
• Case 1: When more no. of challan exists but deduction is entered against only one challan
If two or more Challans are
paid for different deductions, select the required Challan
details against the option 'Select Challan' given at the left top portion of the ‘Deduction’
window and enter the respective deduction details under the selected Challan.
Refer sample data given under ‘Help’ menu → ‘Other Help Items’ → ‘Sample Data’.
• Case 2: In case of FY
2022-23 & earlier
Double click on the error
description and check the deductions entered for the relevant Challan. The above error appears when the ‘Amount
Deducted’ in
Deduction window is more than the 'Deposited – TAX' amount in the Challan window. Hence, reduce the Tax Deducted amount to
the extent of ‘Balance’ amount, shown at the bottom of Deduction window.
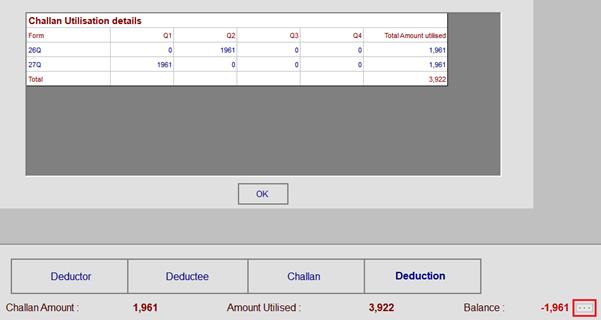
• Case 3: From FY 2023-24
From FY 2023-24, the 'Amount
Utilised' value
in the Deduction window will include all forms and quarters in the file. If you
use the same challan in another quarter or form
within the same file, the total amount used will be shown along with the
remaining balance.
For more details on utilised
amount in a challan and balance available, just click
the three dots ![]() near the balance amount as shown in the
picture below.
near the balance amount as shown in the
picture below.
To know reasons for
difference in the ‘Balance’ amount shown in software and in TRACES website, click here.
.